Color management is the controlled (color space) conversion between the color representations of various color devices (such as cameras, computer screens, printers, and corresponding media), being part of an imaging chain or production workflow:

The goal is consistant color reproduction: obtain a good match across color devices. Colors should appear the same on camera, on computer screen, on printer, and on a printed poster. Color management helps to achieve the same appearance on all these devices, provided the devices can deliver the needed color intensities.
The need for color profiles & reference colors.
Color reproduction has a fundamental problem: a given “color number” doesn’t necessarily produce the same color in all devices. To describe the behavior of various output devices, they must be compared (measured) in relation to a standard color space. The transformation of measurement data into a more regular form is called profiling. An idealized description of the device is created. This description is called a profile.
Color Management starts with calibrating your screen(s) in Windows.
Without calibration colors will not be displayed correctly.
A screen is displayed by a monitor. A monitor can’t show true CMYK. CMYK is reflective light, or subtractive color. A computer display is projected light, or additive color. Therefore, monitors don’t work on CMYK. So, what monitors show is in RGB. Calibration of a monitor screen will always deliver a RGB ICC color profile which will be close to the default sRGB color profile. What calibration does is mapping monitor colors to an absolute colorspace. This is called an ICC color profile. Without such a mapping, the computer just does not know what the monitor shows. In layman’s terms it’s a map to a central location where other maps can continue to the destination.
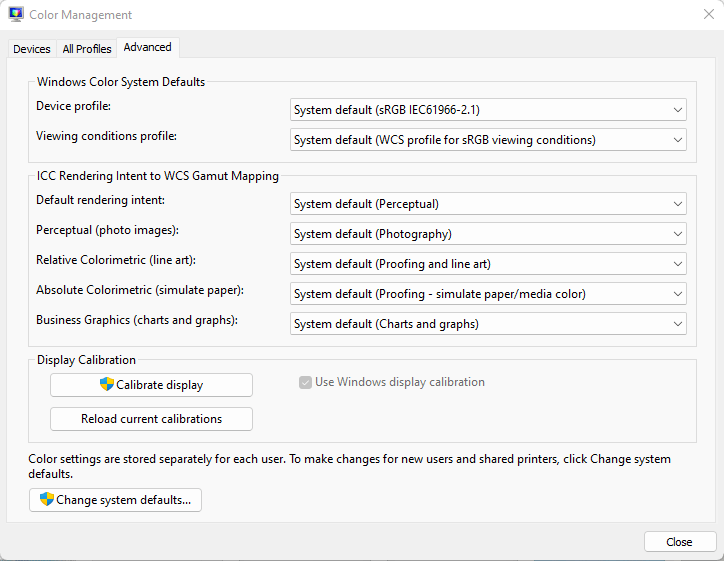
Windows supports the usage of multiple screens, all RGB screens. Go to Control Panel and open Color Management, switch to page Advanced and click the Calibrate display button.
Just follow the instructions to calibrate the screen. When finished calibrating switch back to the first page Devices and note the name of the ICC profile mentioned: filename CalibrateDisplayProfile-1.icc in the picture below:
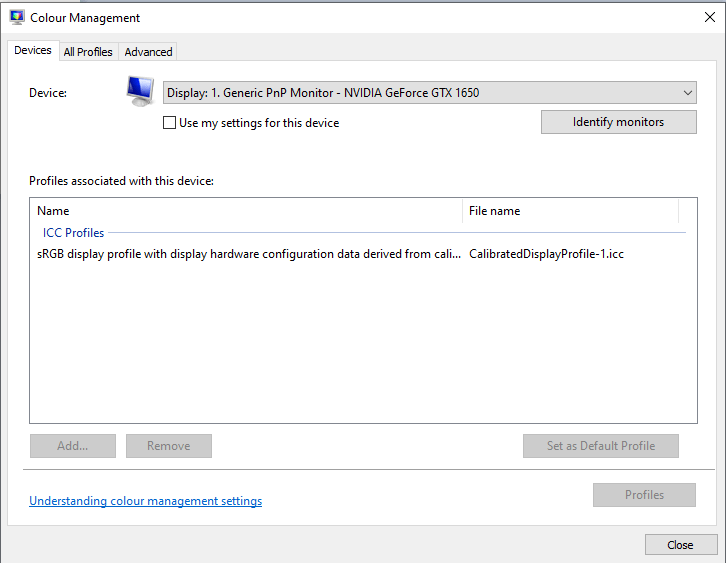
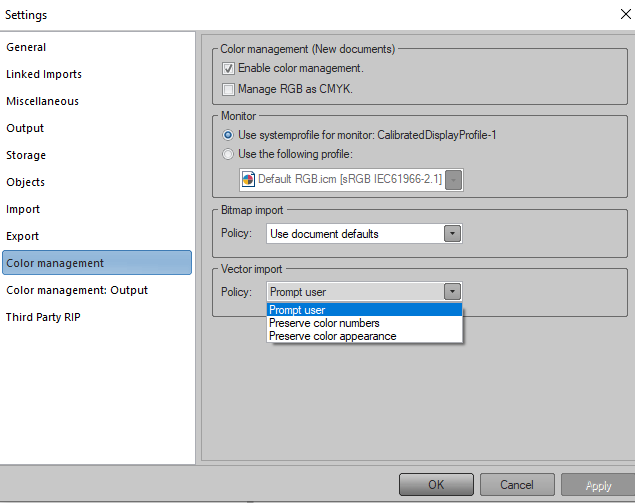
Start application EasySIGN, go to general settings, and open page Color management, and look at groupbox Monitor. Radio button Use systemprofile for monitor mentions the exact same name. It’s a calibrated RGB display profile associated with the calibrated monitor. In case calibration is not supported then select the second radio button and the default sRGB profile:
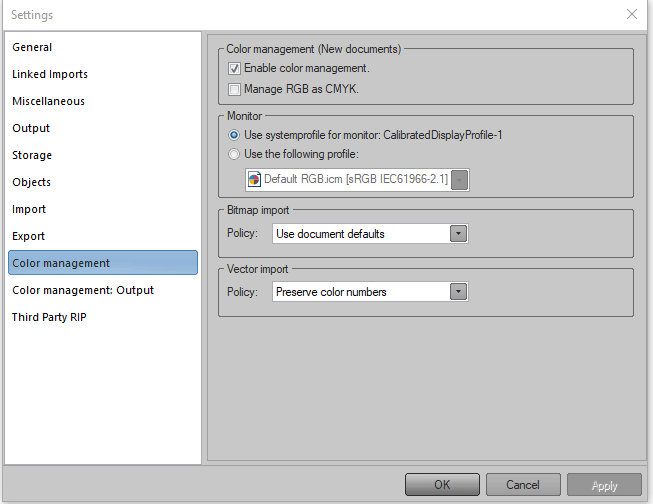
Settings in the first groupbox Color Management (New Documents) apply when empty worksheets (New documents) are added.
Document color management and embedding of color profiles in saved documents.
General settings page Color Management applies to all documents. Also, to each document additional Color Management settings apply. Document related Color Management settings are accessed by a right click of the mouse on a worksheet or document and by choosing menu option Color Management. To every worksheet a maximum of four different ICC color profiles may apply. Vectors and bitmaps have their own RGB and CMYK ICC color profiles and intents. Default settings:
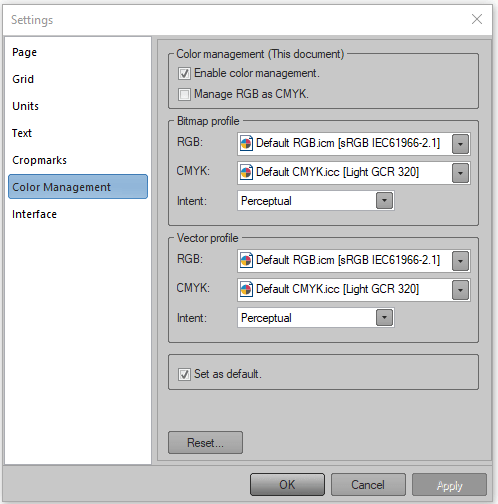
Names of the profiles are mentioned between brackets []: these names will also be found in other applications when these profiles have been installed in specific profile directories these other applications are addressing. General settings page Storage has been equipped with groupbox ICC profiles: when option Embed ICC profiles is activated then the selected ICC profiles will be saved with (in) the document. So, when the saved document is moved to another computer system, then corresponding ICC profiles applied by and in the document will always be present, thus never be missing.
Transport of missing color profiles to EasySIGN.
When EasySIGN imports or opens a PDF-file with embedded color profiles, then missing color profiles will be stored automatically into the color profiles directory of EasySIGN, for reuse. So, the easiest way to transport missing color profiles to the computer where EasySIGN is running is via embedding these color profiles into a PDF-export document and opening or importing this document in EasySIGN.
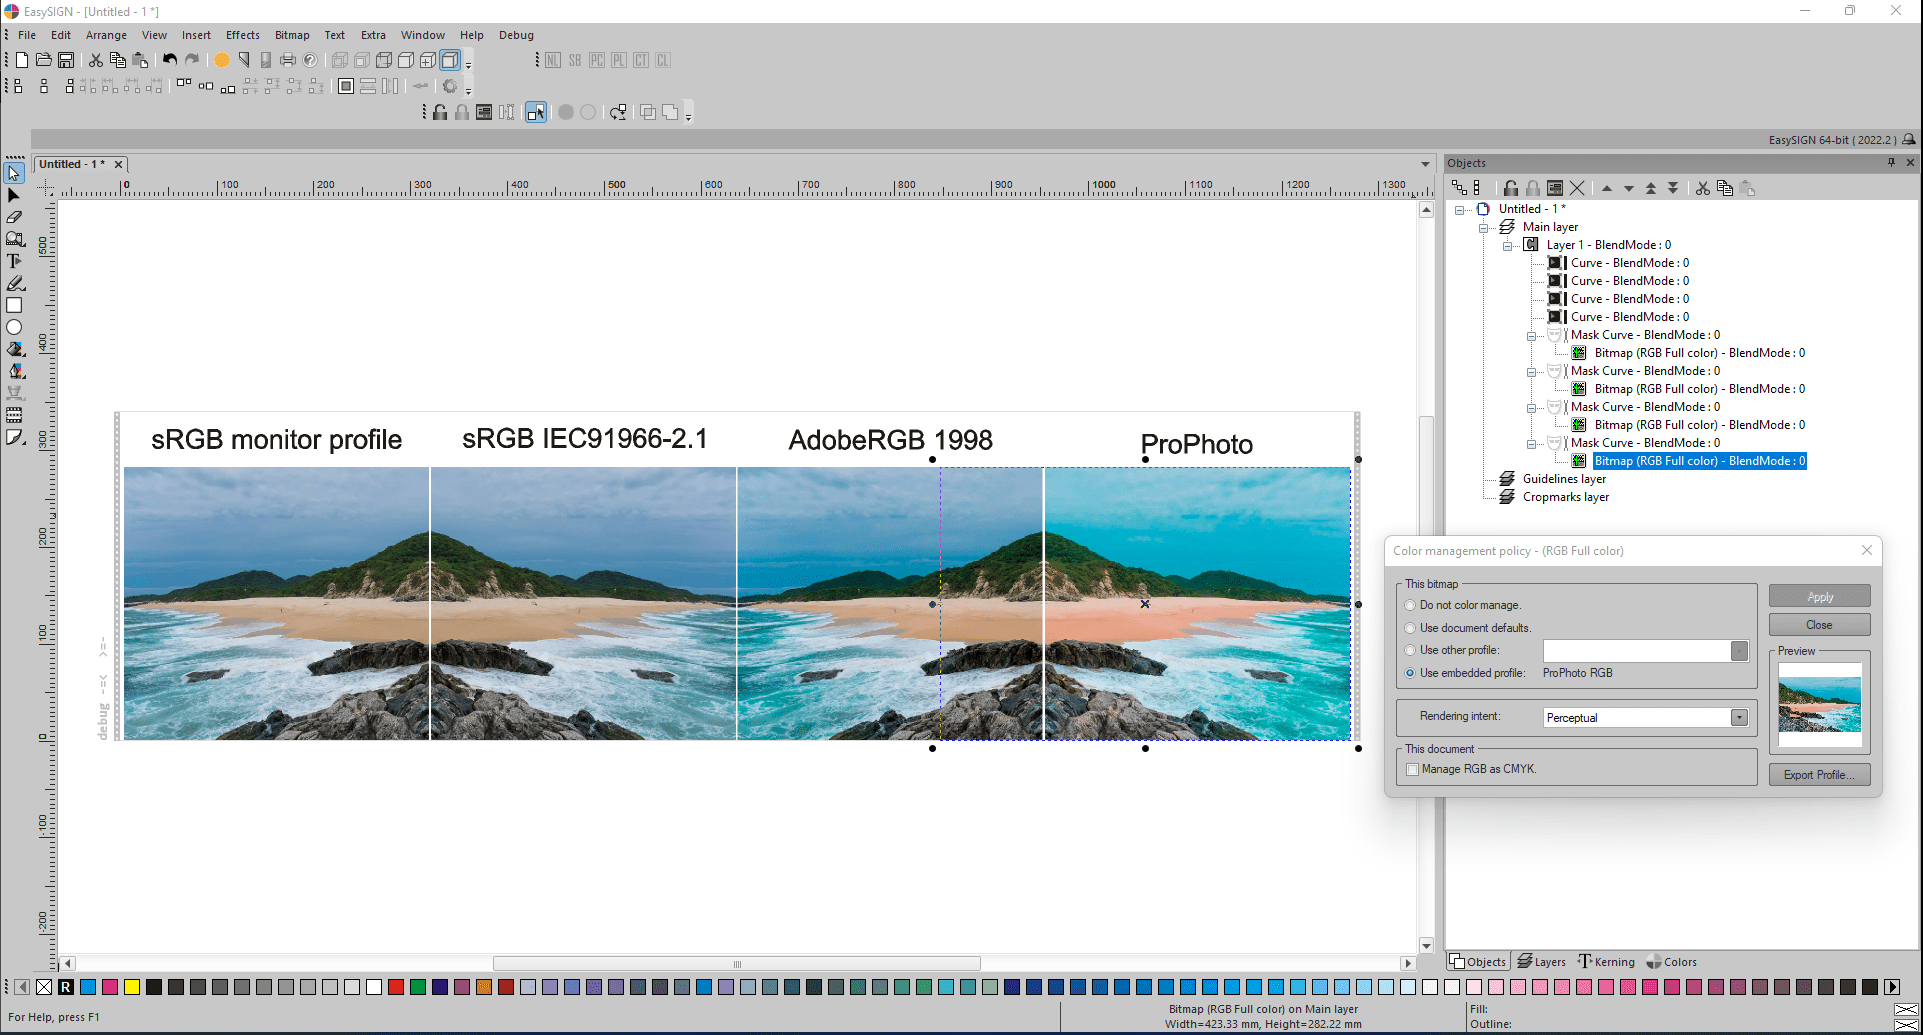
Bitmap color management.
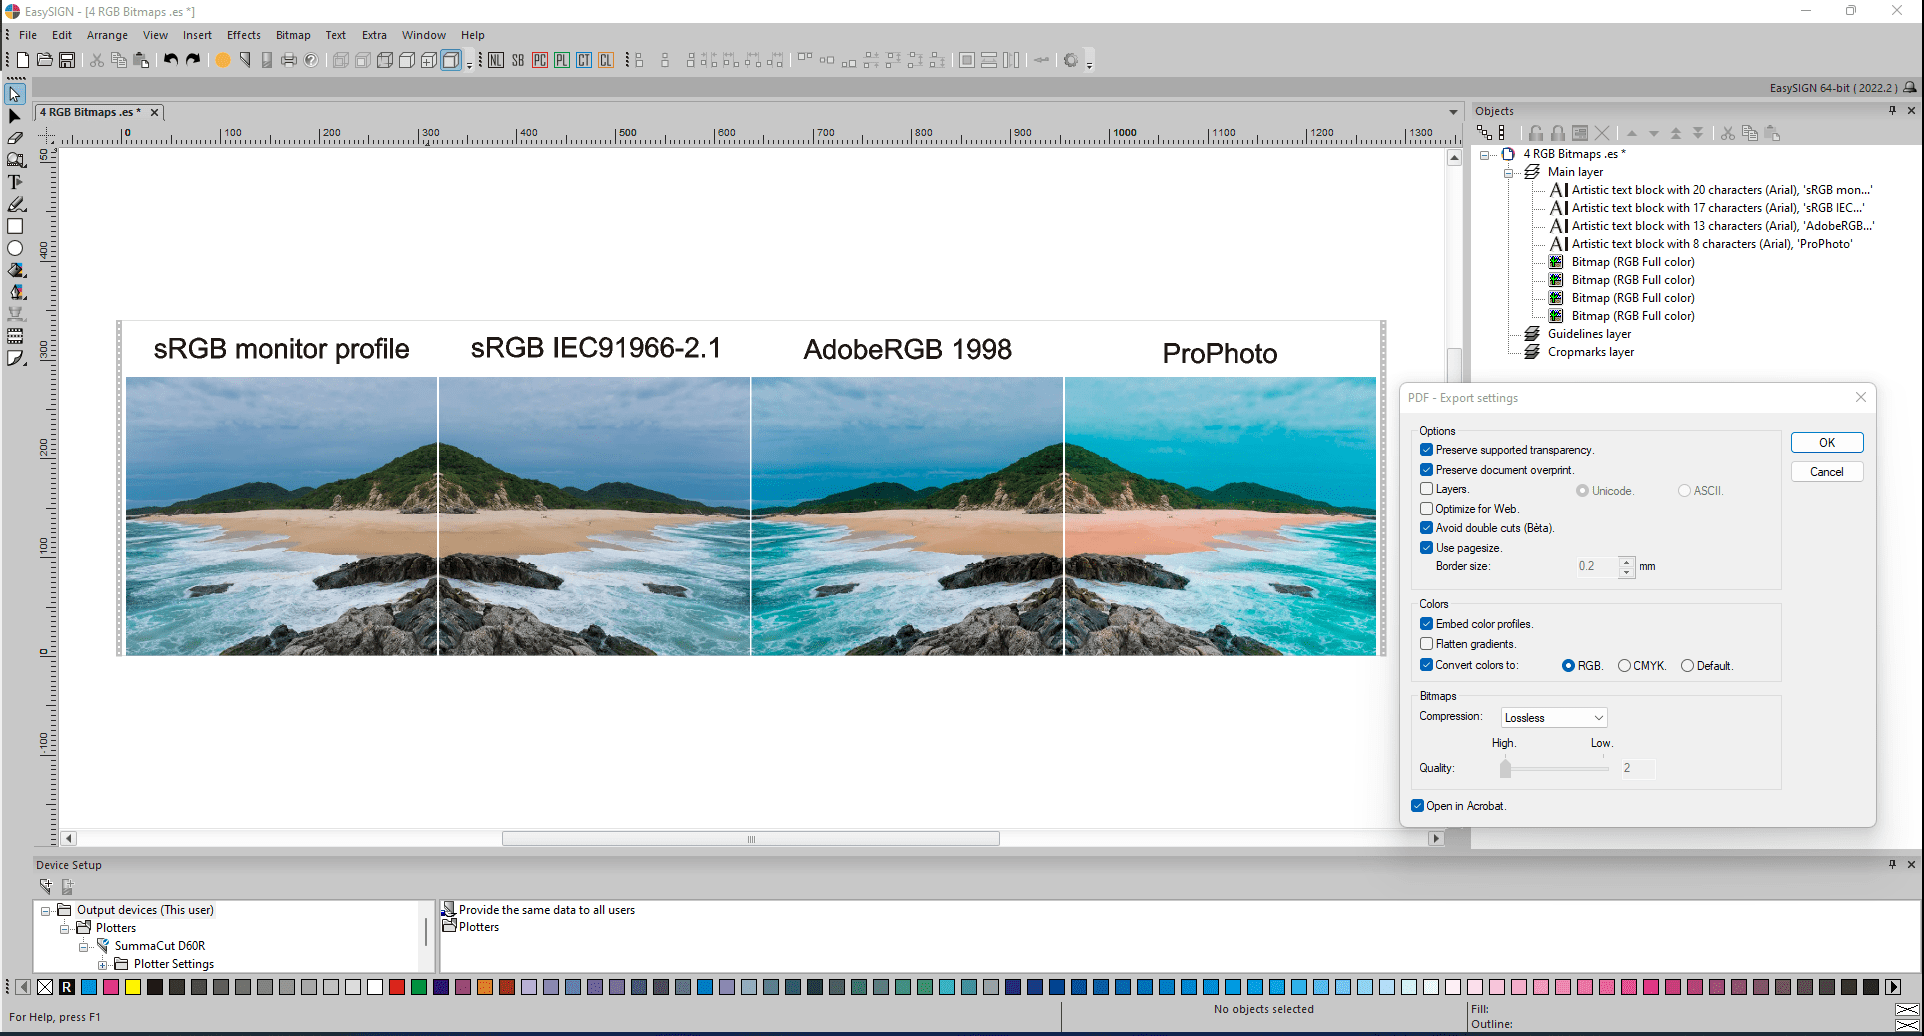
In EasySIGN every bitmap displayed is allowed to be color managed separately, independent of document management, or, following document management. An example of four different profiles active simultaneously. Which beach do you prefer to visit:
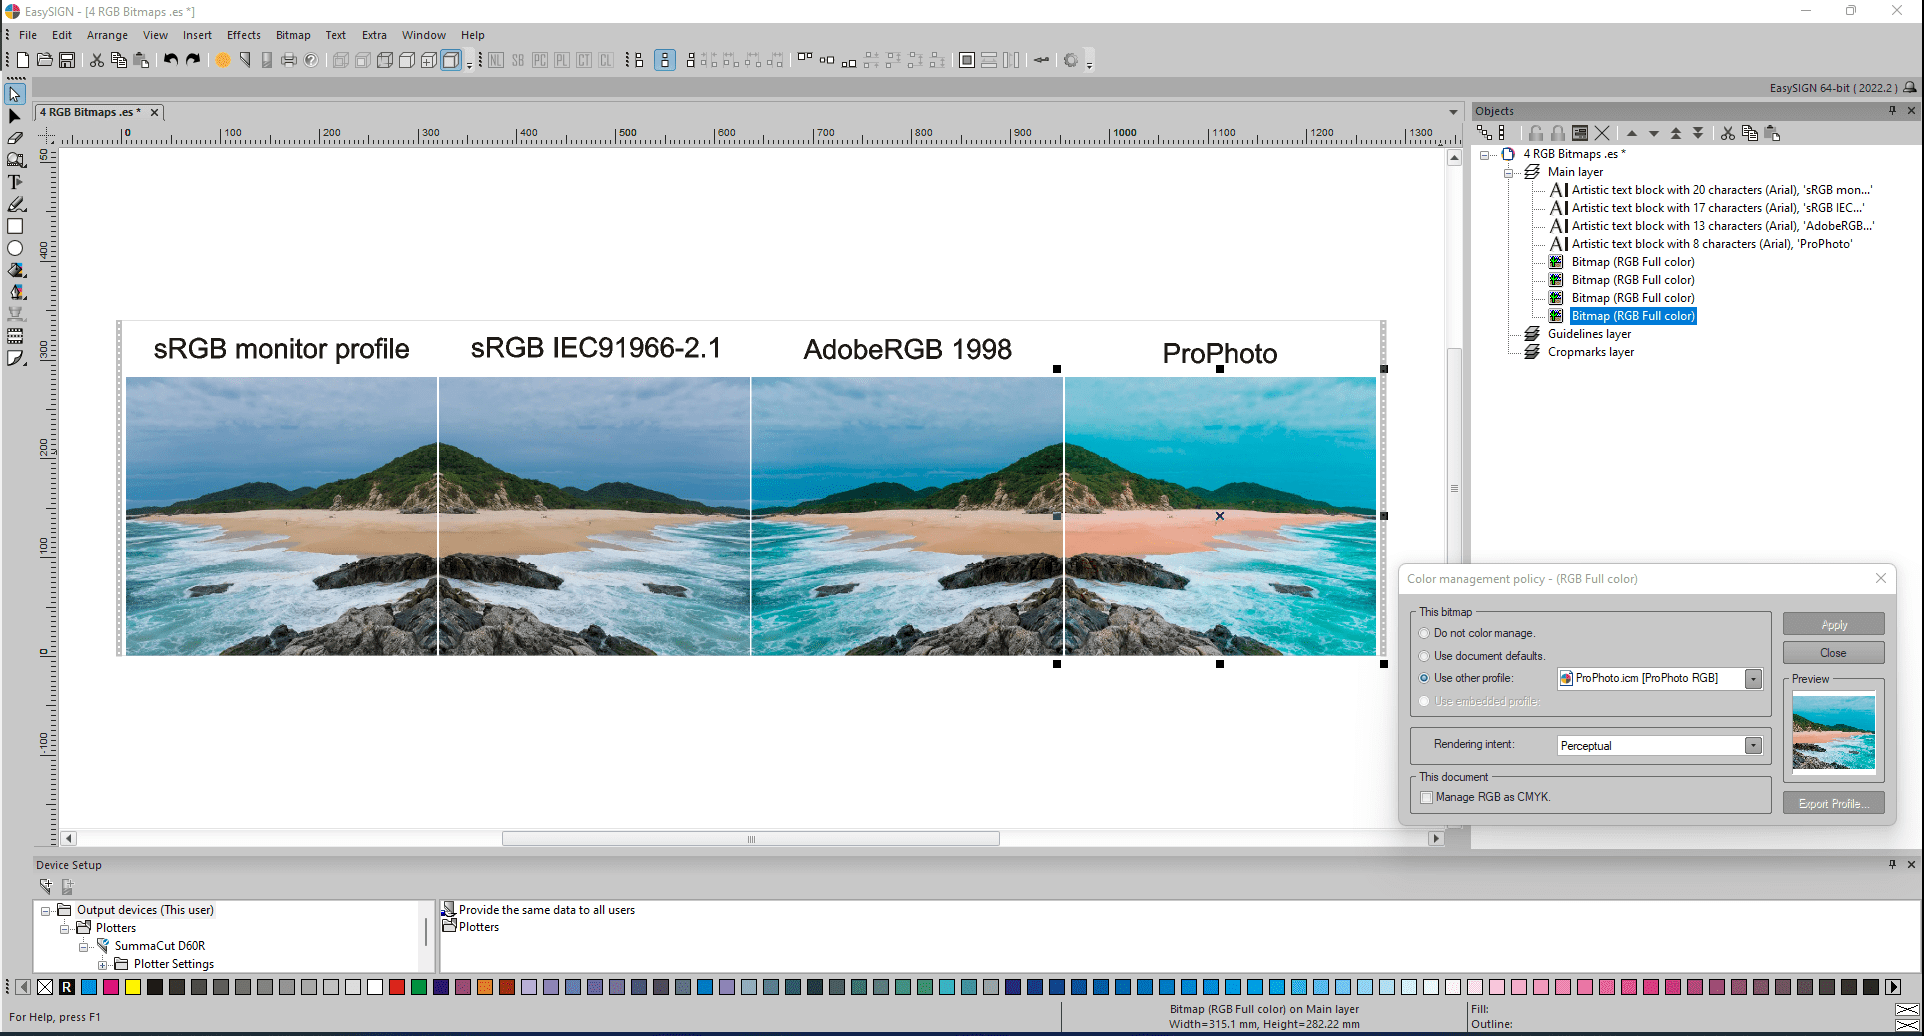
First two pictures on the left of which one is mirrored, look very similar, because the calibrated profile on the left does not differ much from default sRGB (2nd mirrored bitmap). Profiles AdobeRGB 1998 and ProPhoto do change color appearances (colors of sky, plants, beach and water). Be aware that the actual content of bitmaps, thus the values of pixels in each of these four bitmaps have not been changed. In EasySIGN color engine Little CMS (LCMS) generates the different appearances based upon the different color profiles activated.
General tips on how to choose what color space to work in.
Color space matters. It matters when making a print. It really matters when posting on the Internet.
sRGB.
sRGB was developed in 1996, jointly by HP (Hewlett Packard) and Microsoft for tube type color monitors, where “s” can be interpreted as “standard”. No matter what space you choose to edit in, almost all your exports for the web and social media should be converted to sRGB. It is the only color space to use on the web. This color space was designed with compatibility in mind. Whether you’re looking at a photo on your brand-new iPhone or on Grandma’s 20-year-old desktop that smells like cigarettes, the color in your images will appear consistent across any device. For artwork photography to look accurate in a jury environment, they need to be in de sRGB color space. Printing press companies and most photo labs use sRGB. Today, many monitors and some printers can show or reproduce more colors than sRGB has in it.
Adobe RGB 1998.
Adobe was one of the first to develop a color space that had a wide gamut while also being technologically feasible to use on modern devices. Even now, many photographers and editors will use this as a standard since it covers such a practical range and is almost universally accepted by many different software and displays. Adobe RGB 1998 encompasses the CMYK color space for printing presses. It is larger than sRGB.
ProPhoto RGB.
ProPhoto RGB was developed by Kodak in 2000 to show all possible colors in Ektachrome film. Its name suggests an ideal profile for working with photos in a professional environment. ProPhoto RGB has a much wider gamut than the older Adobe RGB 1998. Many photographers preset this color space because this is where most DSLRs and mirrorless cameras capture. While Adobe RGB 1998 can still work, editing in ProPhoto RGB with images from a modern camera will give you the absolute most flexibility in post-production.
When a monitor displays CMYK colors it does not actually show the true CMYK color.
Most users do design something not for screens but for printing purposes. Then users need to stick with the CMYK color model because CMYK is the color of the result on printed media. Since monitors do not work with CMYK, what the monitor is capable of showing is a conversion of CMYK in RGB. CMYK and RGB are never exactly convertible. There are always some differences. So, what the user is seeing is not the color the user gets: there is no way of correctly viewing CMYK without committing ink to paper. It wouldn’t make sense for a monitor to have a CMYK mode as the myriad of variables pertaining to CMYK such as paper types, ink sets, press versions etc. are best handled by the software being used and not the monitor.
Four different color Intents to preserve color.
The biggest problem is what to do with CMYK colors that cannot be shown. So, there is in fact 4 methods in the standards for dealing with this called intent. The four intents are named differently by different vendors. These terms are used by EasySIGN:
- Perceptual (also called Image),
- Relative colorimetric,
- Saturation (also called Display),
- Absolute colorimetric.
Now these govern what happens when the color cannot be displayed. The colorimetric intents try to preserve the color. The difference is that Absolute colorimetric just clips the exceeding color and Relative colorimetric finds the nearest color scaled by medium, which is more in line with photography. Saturation is when the user needs saturated colors but don’t care of the exact color, like business graphics. Perceptual works by scaling the entire image to fit into the showable color space (called gamut): this works well for images as the human visual system is only interested in relative colors. In natural images our color processing engine kicks in and correct colors somewhat.
Primarily work in RGB and let the printer convert.
Some users prefer to receive images properly tagged SRGB, AdobeRGB, or PhotoRGB. The reason being the RGB gamut is larger than CMYK. If an image is converted to a generic CMYK profile simply for the purpose of making the image CMYK, then you have likely compressed the gamut smaller than the printers could otherwise print. In other words, you may lose some color that had the ability to print.
Exchange of colors between Adobe Illustrator and EasySIGN.
First part of an imaging chain or production workflow is compatibility: a communication link between Adobe Illustrator designs and EasySIGN worksheets. Two types of working spaces exist in Adobe Illustrator: RGB or CMYK. Adobe Illustrator does not support both working spaces simultaneously on one single worksheet.
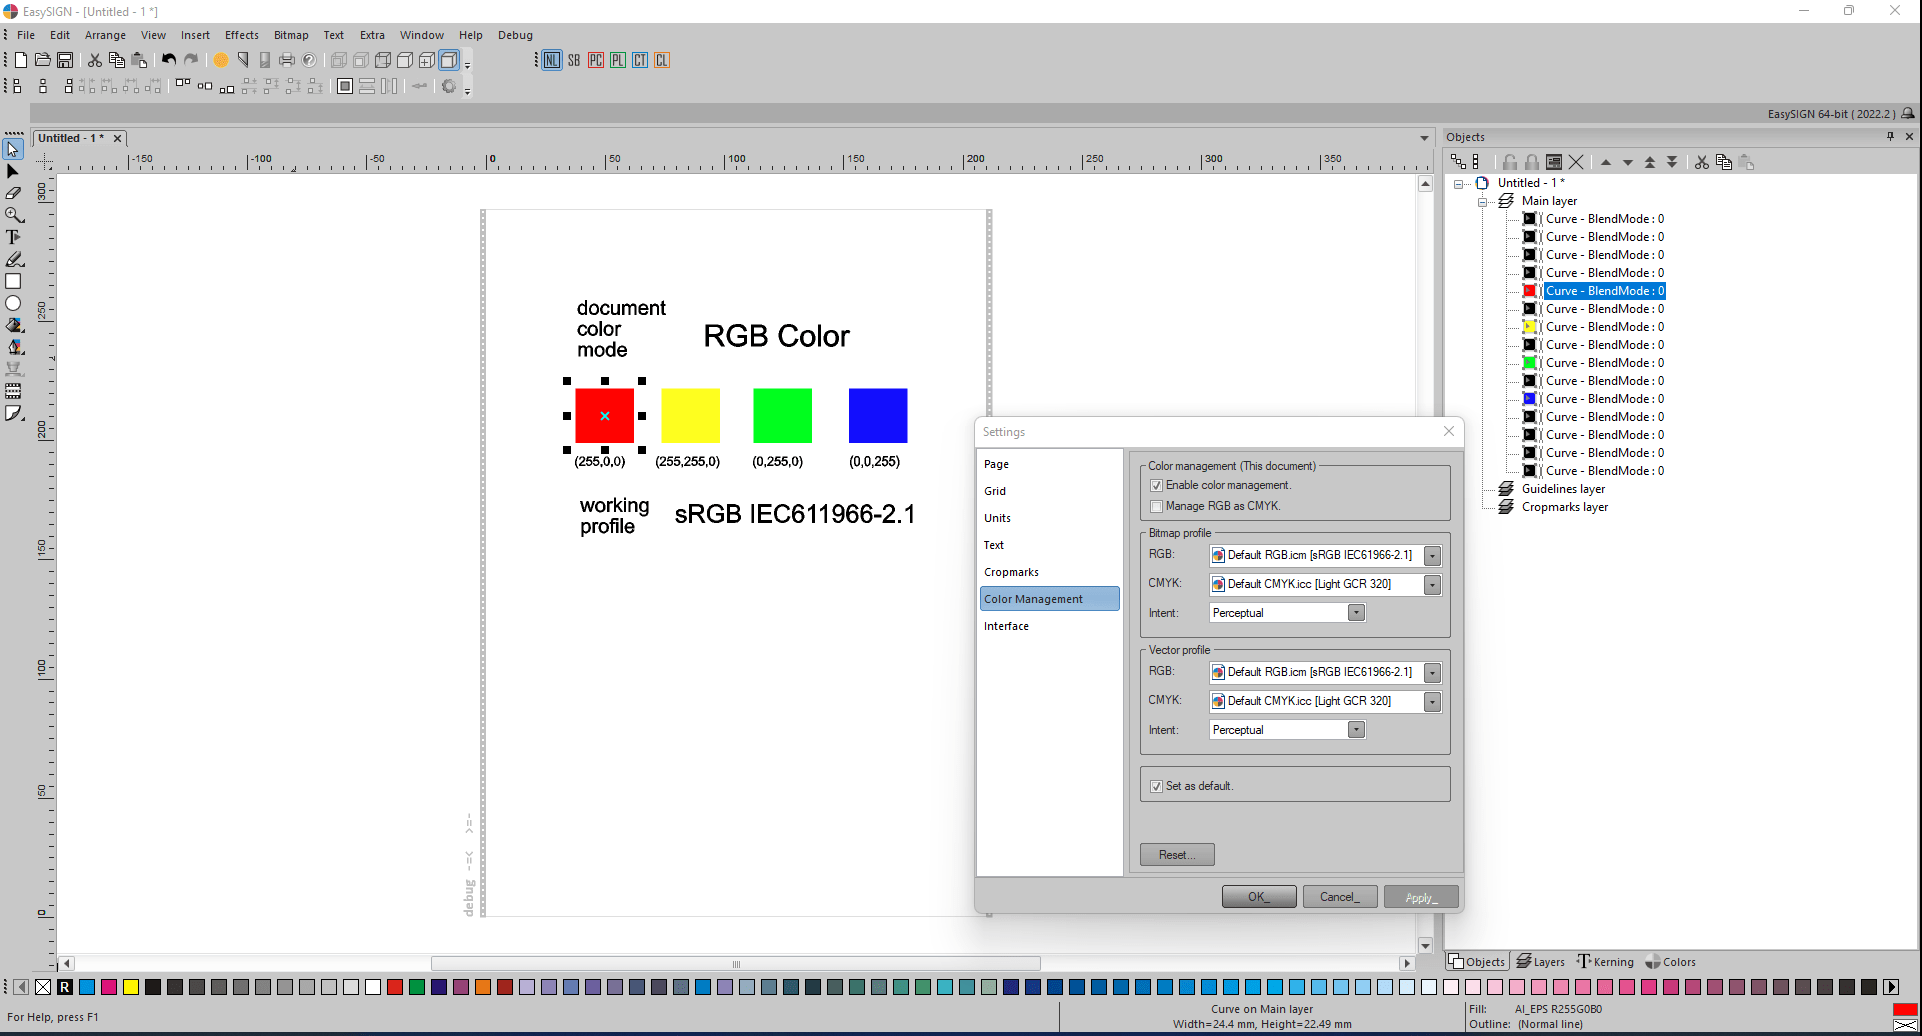
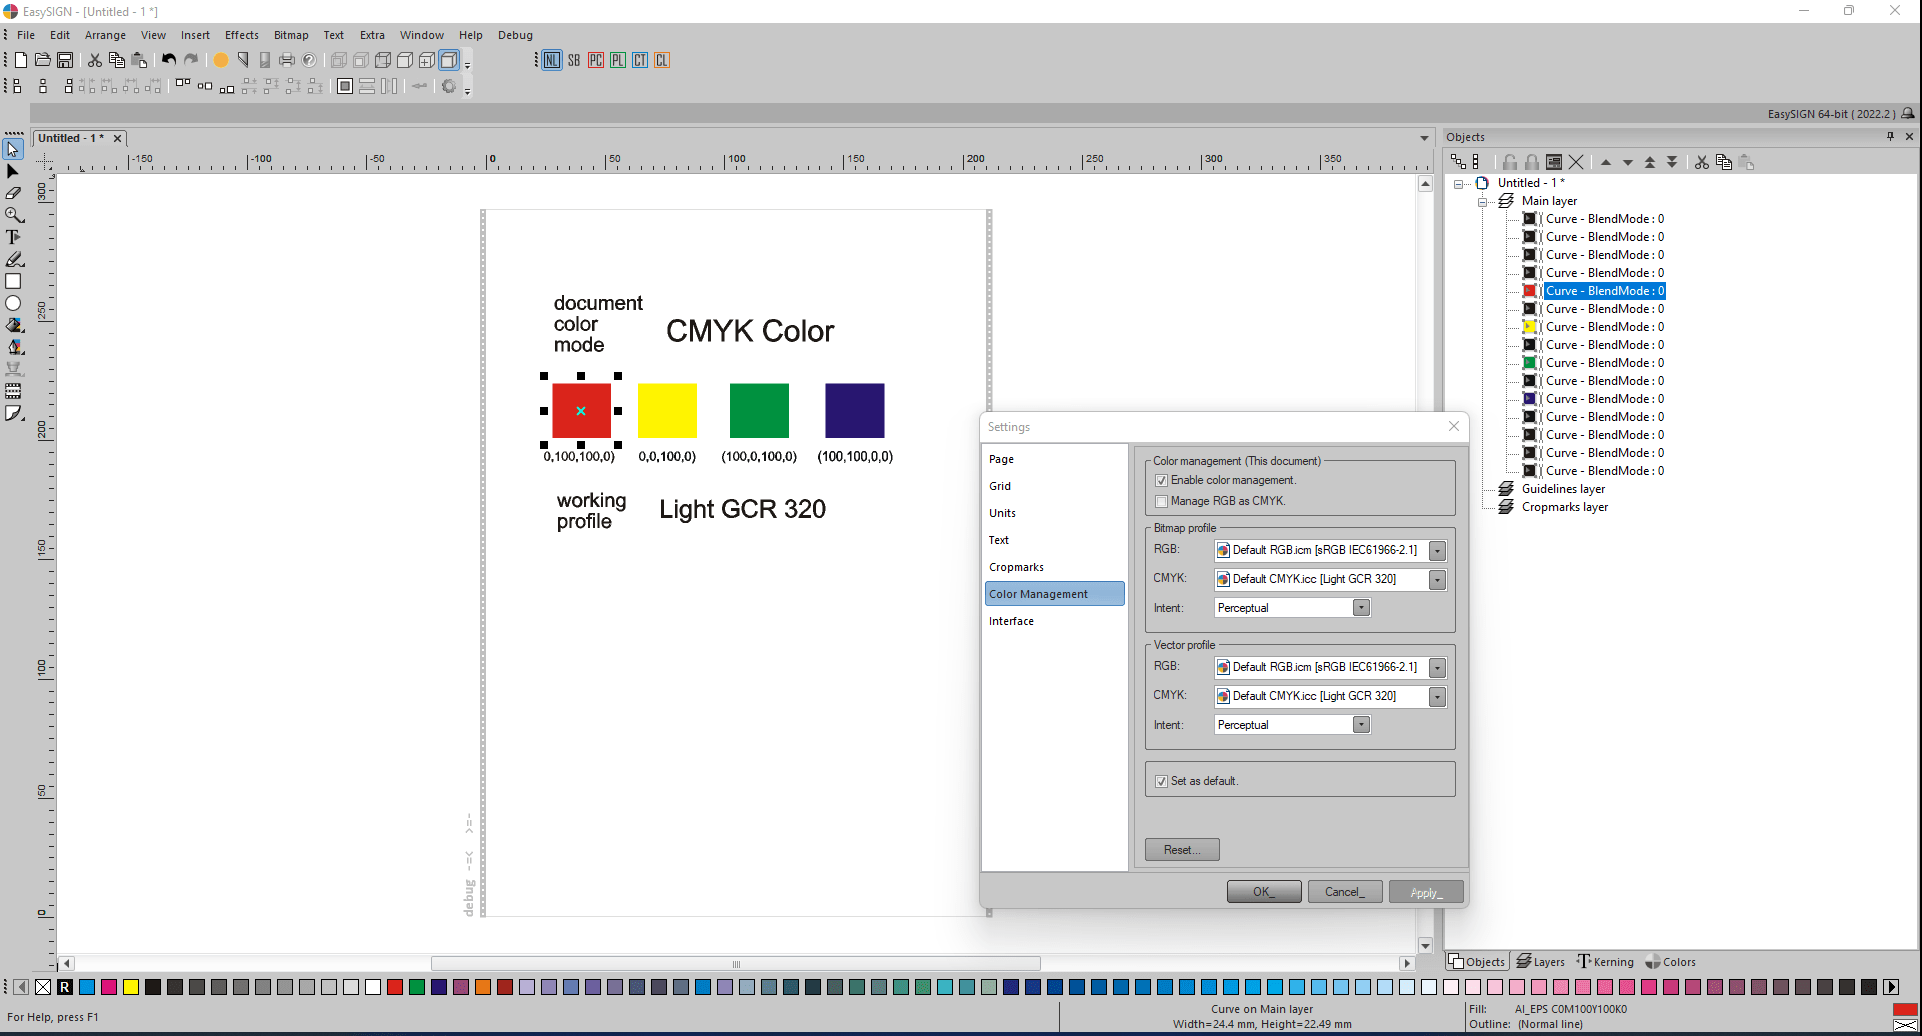
An example of a worksheet having four RGB colored rectangles:
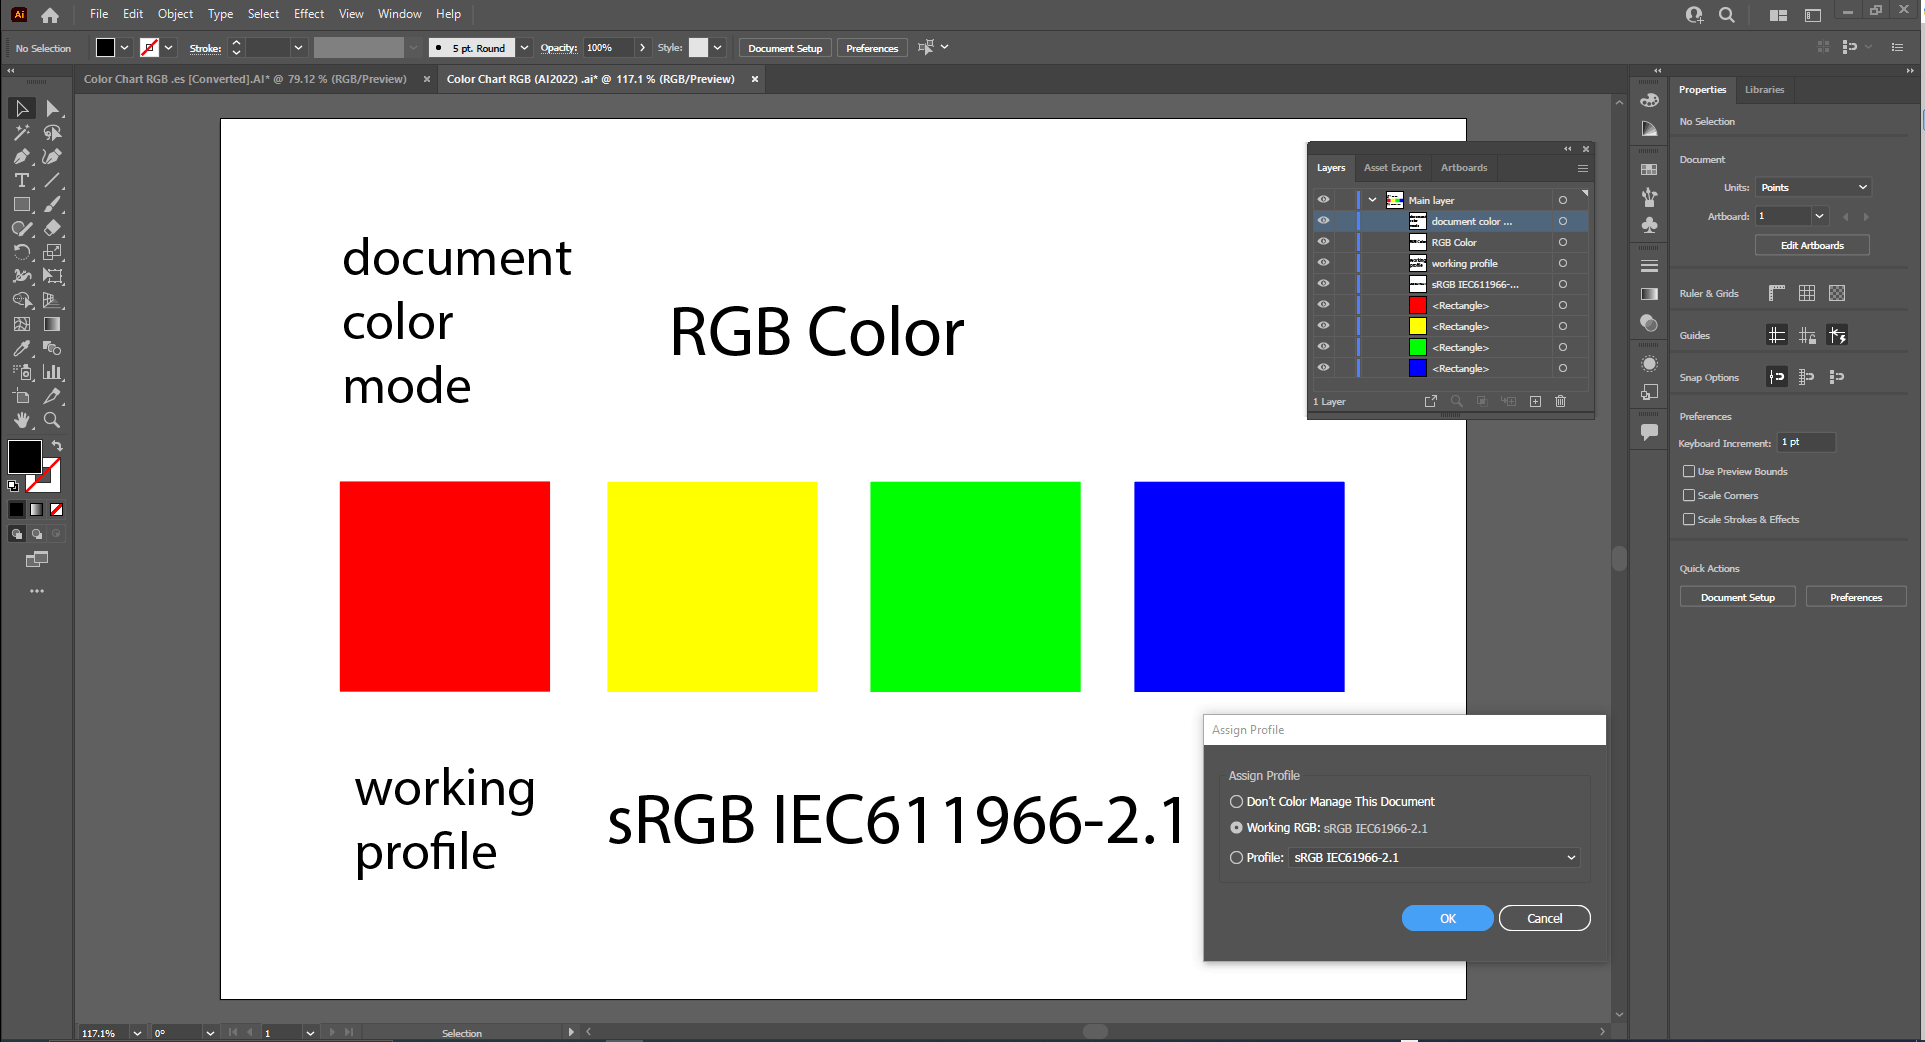
Adobe Illustrator content communicated via compatibility to a worksheet in EasySIGN:
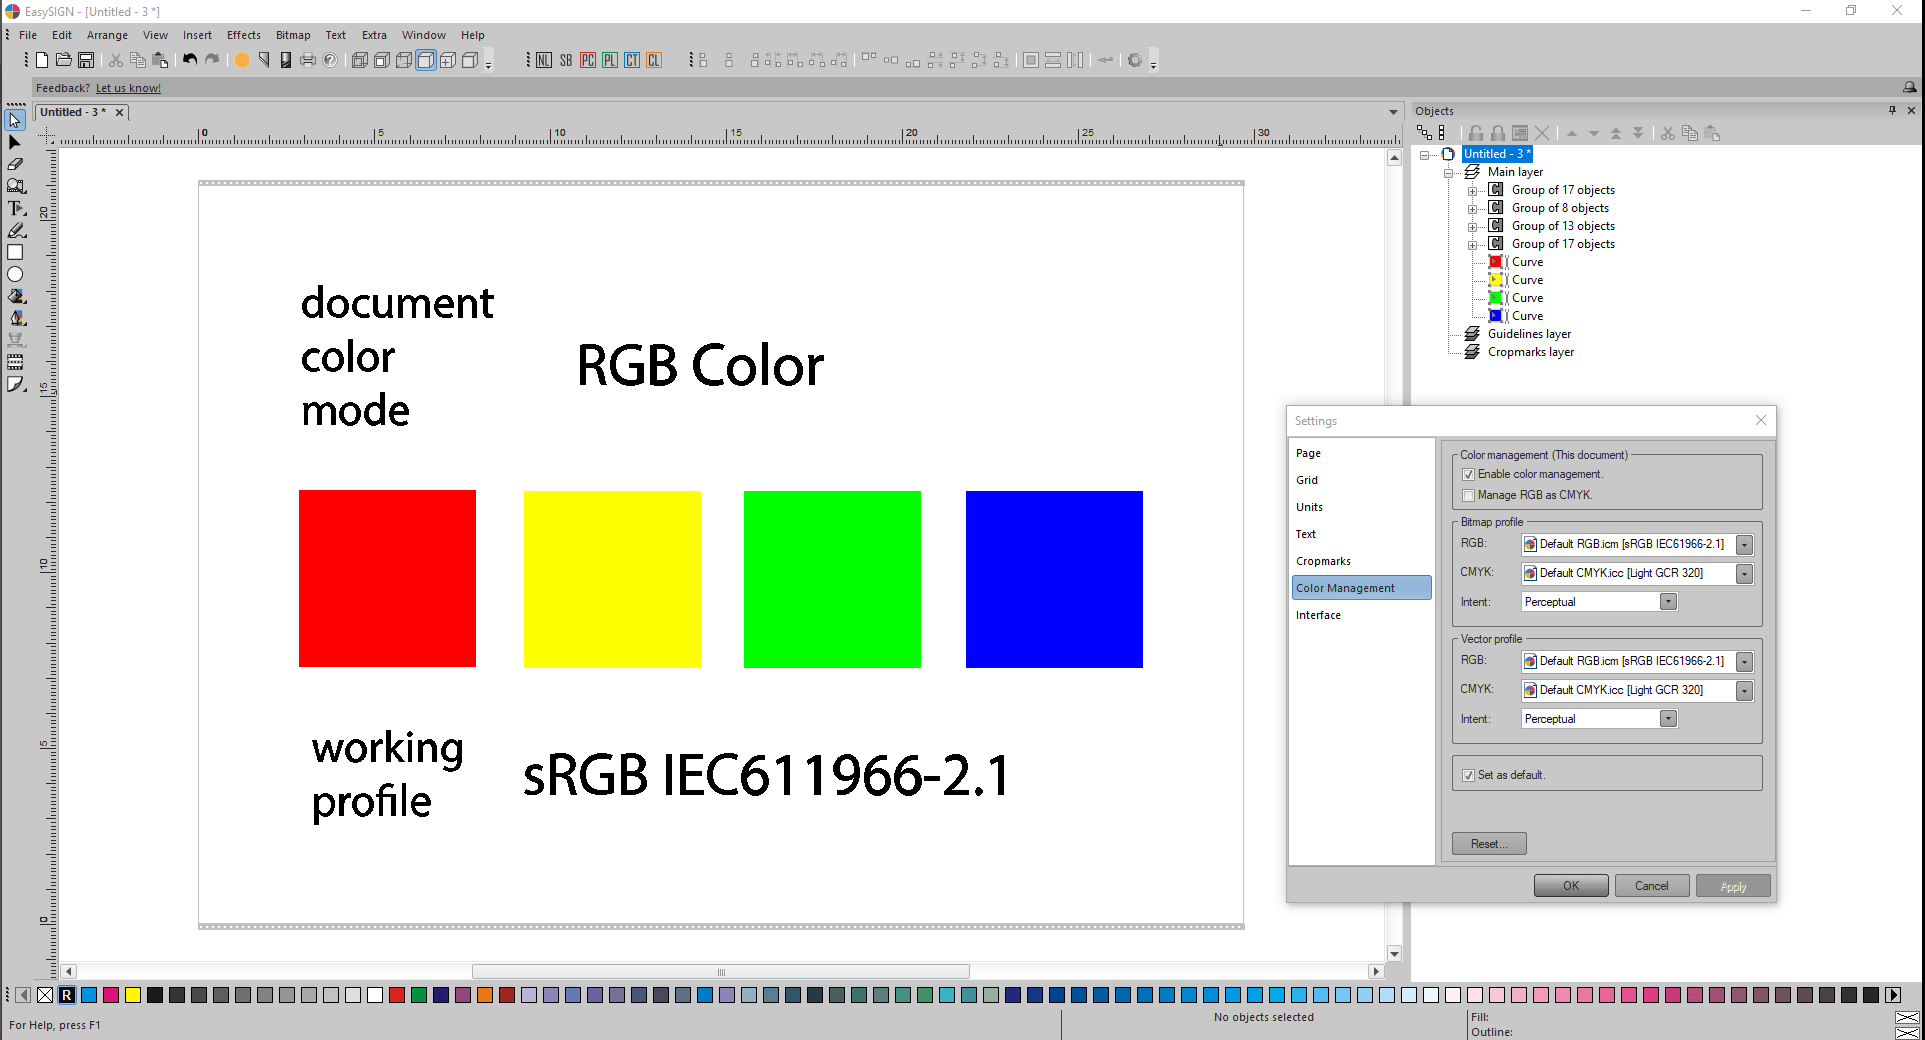
Exact same color numbers as well as color appearances apply after communication because prior to the communication the exact same color profiles were selected in both applications.
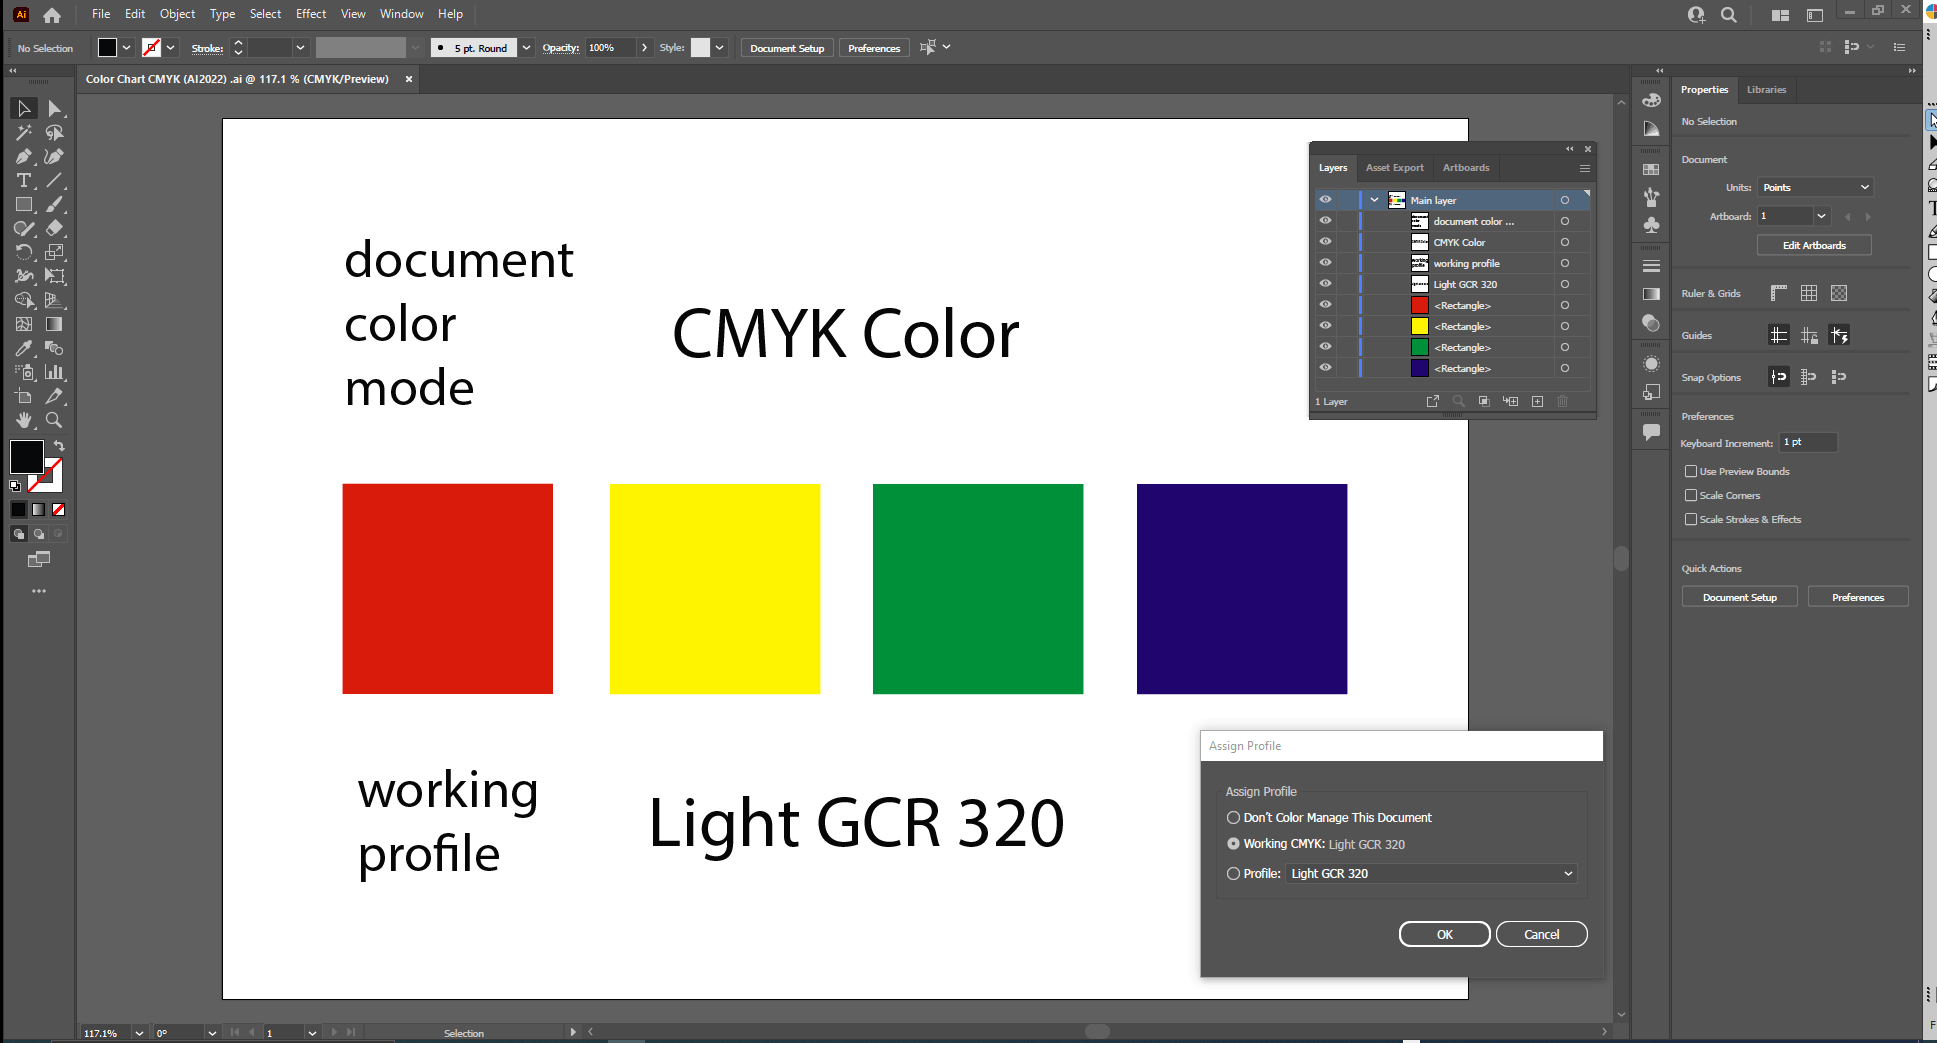
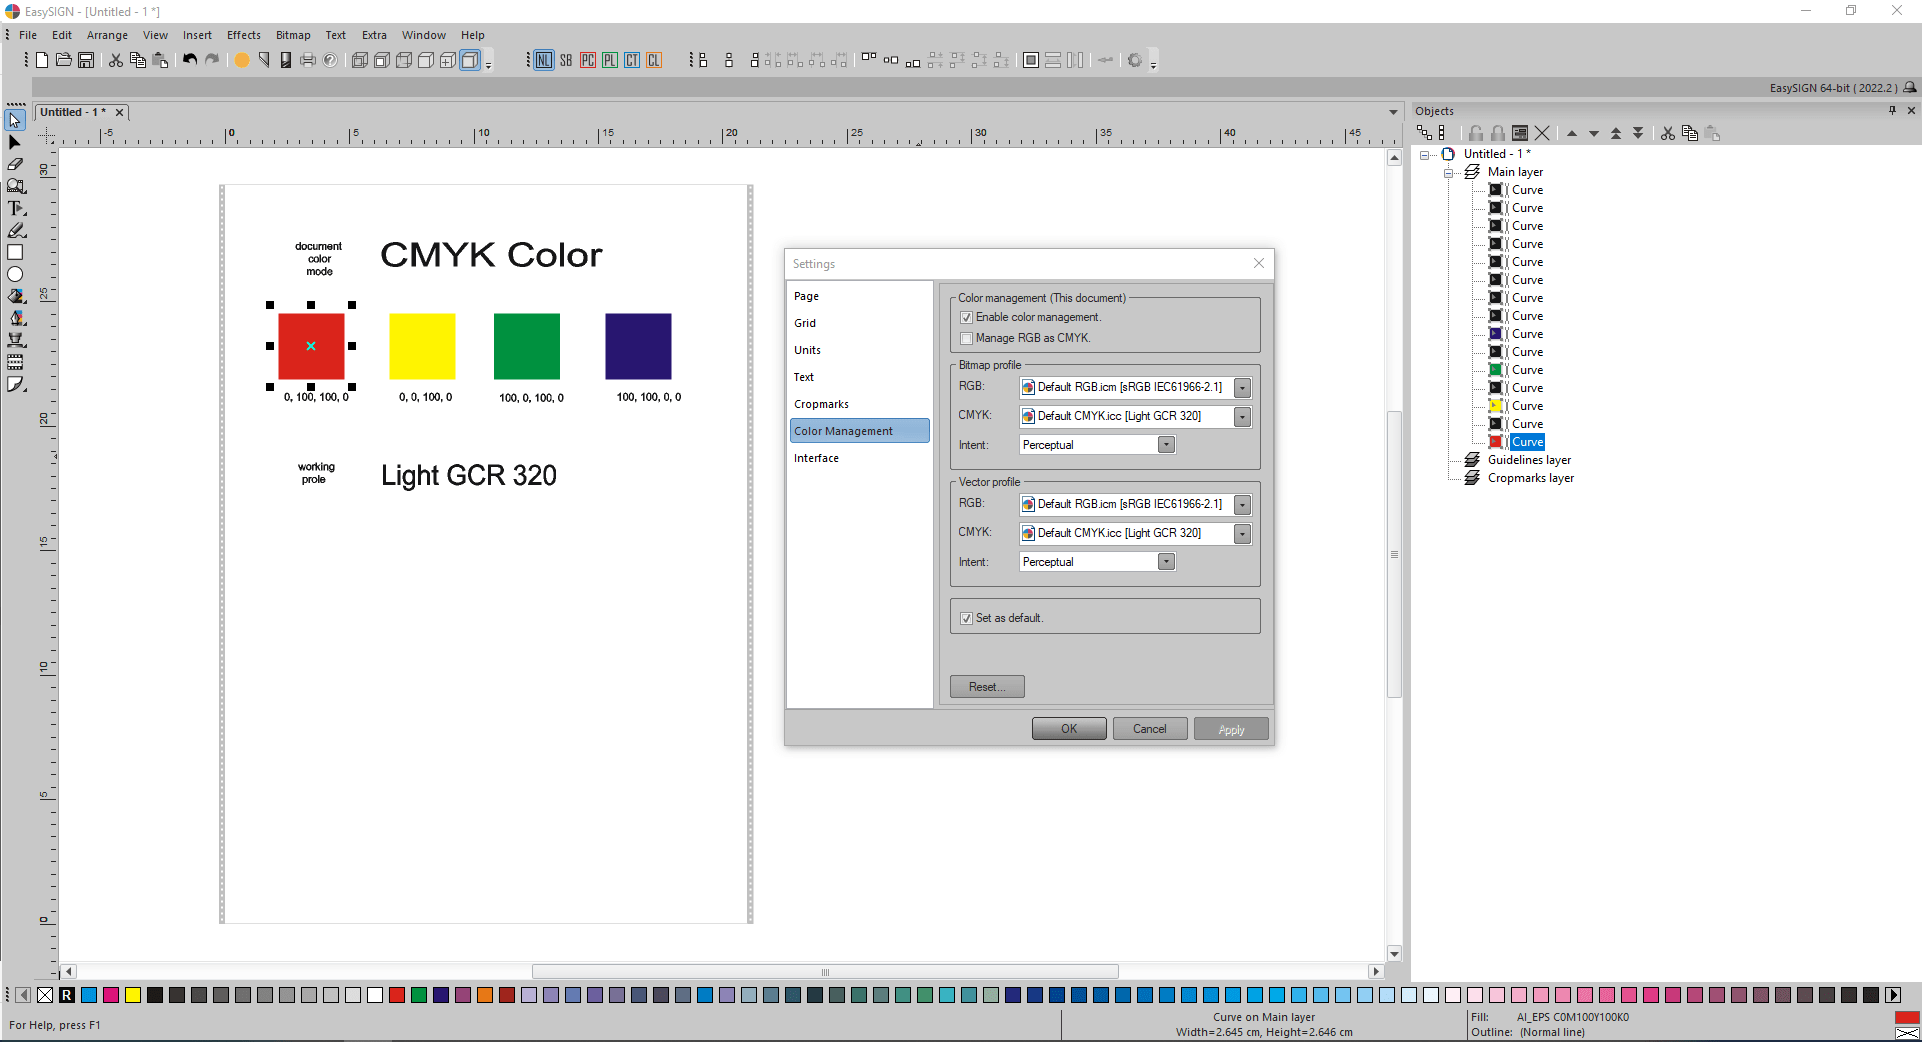
An example of a worksheet having four CMYK colored rectangles:
Note:
color of each of the four CMYK colored rectangles here above do differ significantly from the four RGB colored rectangles. Since an Adobe Illustrator worksheet is only capable of showing one single color space mode, RGB or CMYK, these differences in color due to different color spaces will never ever occur on a single Adobe Illustrator worksheet.
Adobe Illustrator content communicated via compatibility to a worksheet in EasySIGN:
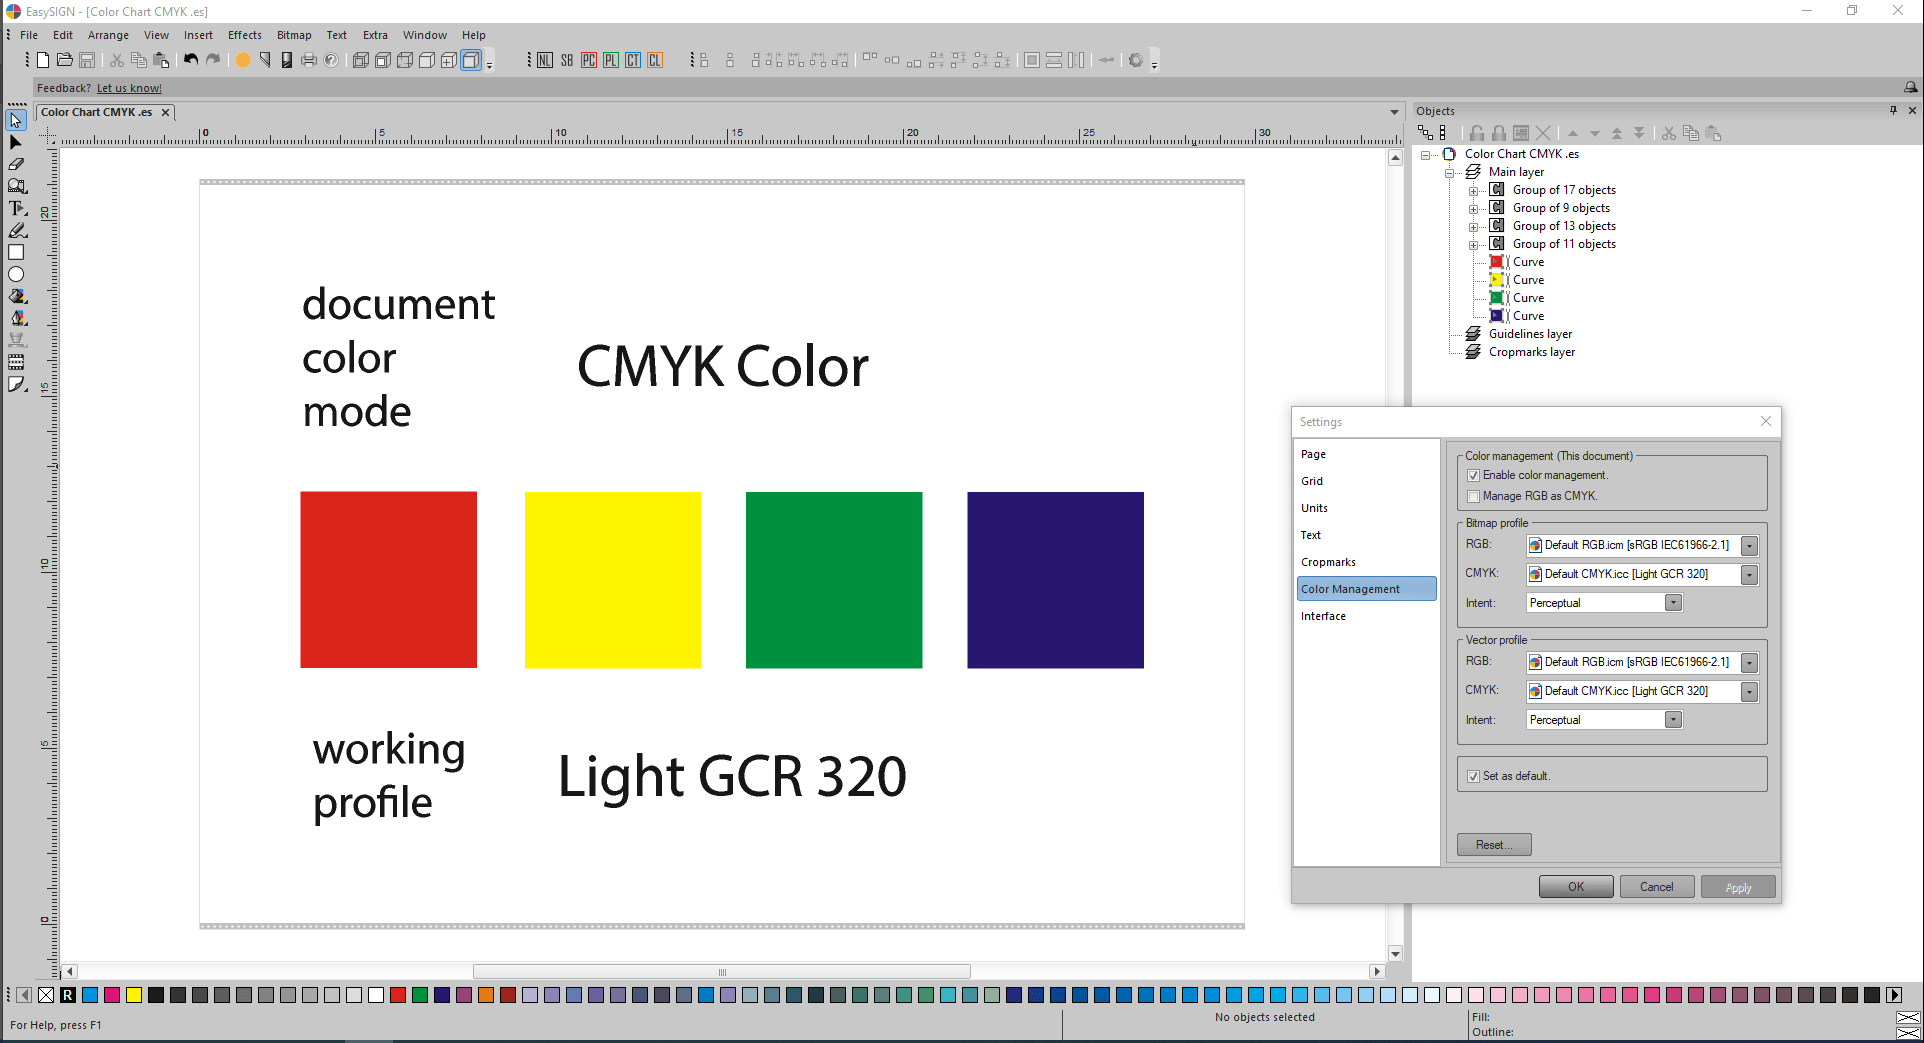
Exact same color numbers as well as color appearances apply after communication because prior to the communication the exact same color profiles were selected in both applications.
Notes:
Location of ICC profiles for Adobe Illustrator:
C:\Program Files (x86)\Common Files\Adobe\Color\Profiles
C:\Program Files (x86)\Common Files\Adobe\Color\Profiles\Recommended
Locations of ICC profiles in use by EasySIGN:
C:\ProgramData\EasySIGN\Shared 64-bit\Profiles
C:\Windows\System32\spool\drivers\color
Before starting up Adobe Illustrator, for CMYK colors, ICC color profile Light GCR 320.icc must be copied manually from location of ICC profiles for EasySIGN to location of ICC profiles for Adobe Illustrator. Then ICC color profile Light GCR 320.icc can be selected in Adobe Illustrator.
Adobe Illustrator has been equipped with two color engines:
- Adobe (ACE), and
- Microsoft ICM
Because EasySIGN applies Little CMS (LCMS) differences in color engines exist. Therefore, it is important for both Adobe Illustrator as well as EasySIGN to keep applying precisely matching ICC color profiles to prevent minor differences in color numbers as well as color appearances.
Exchange of colors between CorelDRAW and EasySIGN via compatibility.
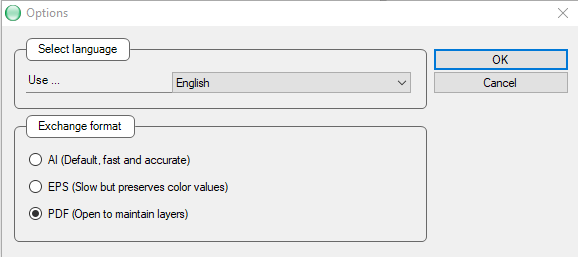
Initially, be aware the Exchange format of the compatibility program for CorelDRAW has been set to AI version 8.0 (Default, fast and accurate). So, at VBA Macro level in CorelDRAW, AI version 8.0 will be applied to the export of selected contents towards the standard AI-import filter of EasySIGN:

Before ColorDRAW is started up and colors are exchanged, first the default CMYK profile of application EasySIGN Light GCR 320 must be placed at its proper CorelDRAW location:
C:\Program Files\Corel\CorelDRAW Graphics Suite 2022\Color\
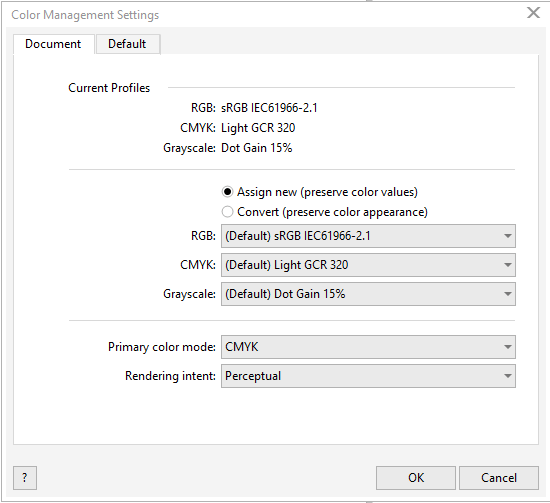
Then startup CorelDRAW, go to Tools -> Color Management and adjust the settings at tab pages Default and Document to the Color Management settings in EasySIGN:
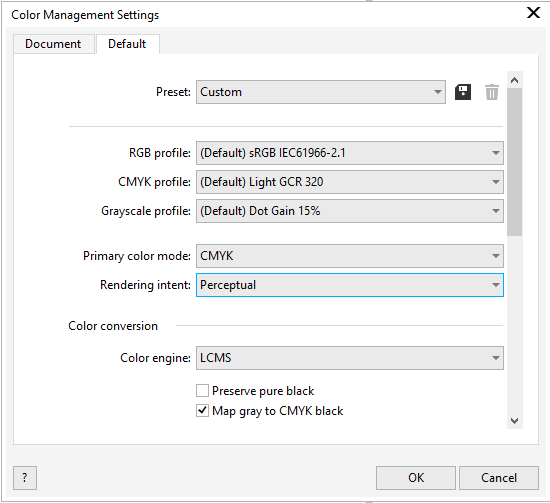
Here above choose color engine LCMS.
Following contents of document properties, the document mode of the created CorelDRAW document is set to Primary color mode RGB, so the active and selected RGB ICC color profile sRGB IEC61966-2.1 applies to each of the four RGB colors:

Please be aware that in CorelDRAW both RGB as well as CMYK colors are allowed to be present on the same worksheet.
Design presented in the picture above only contains RGB colors.
Content is transferred to EasySIGN via compatibility:
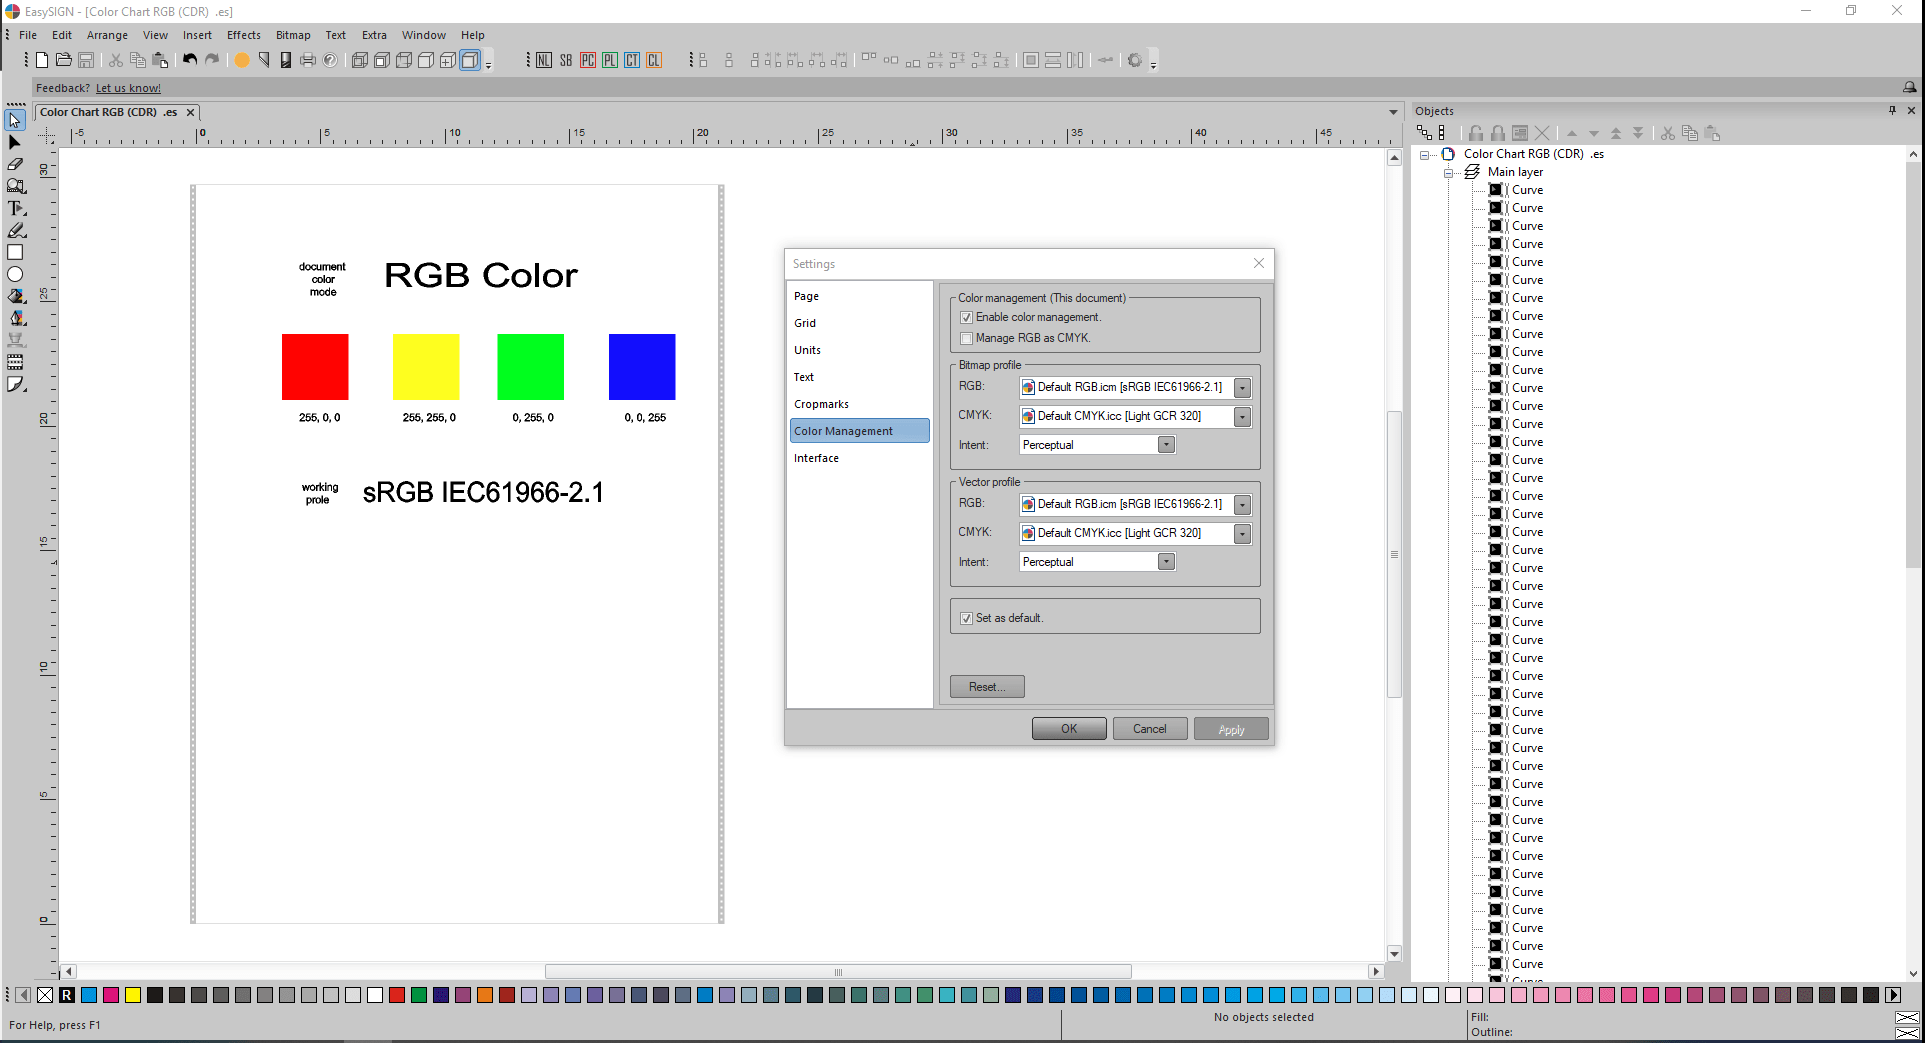
Color values and color appearances are equal between both applications because the exact same RGB ICC color profiles have been selected in both applications.
Note:
In CorelDRAW three different color engines are available:
- LCMS (Little CMS) (compatible with EasySIGN),
- Microsoft WCS, and
- Microsoft ICM CMM.
Following contents of document properties, the document mode of the created CorelDRAW document is set to Primary color mode CMYK, so the active and selected CMYK ICC color profile Light GCR 320 applies to each of the four CMYK colors:
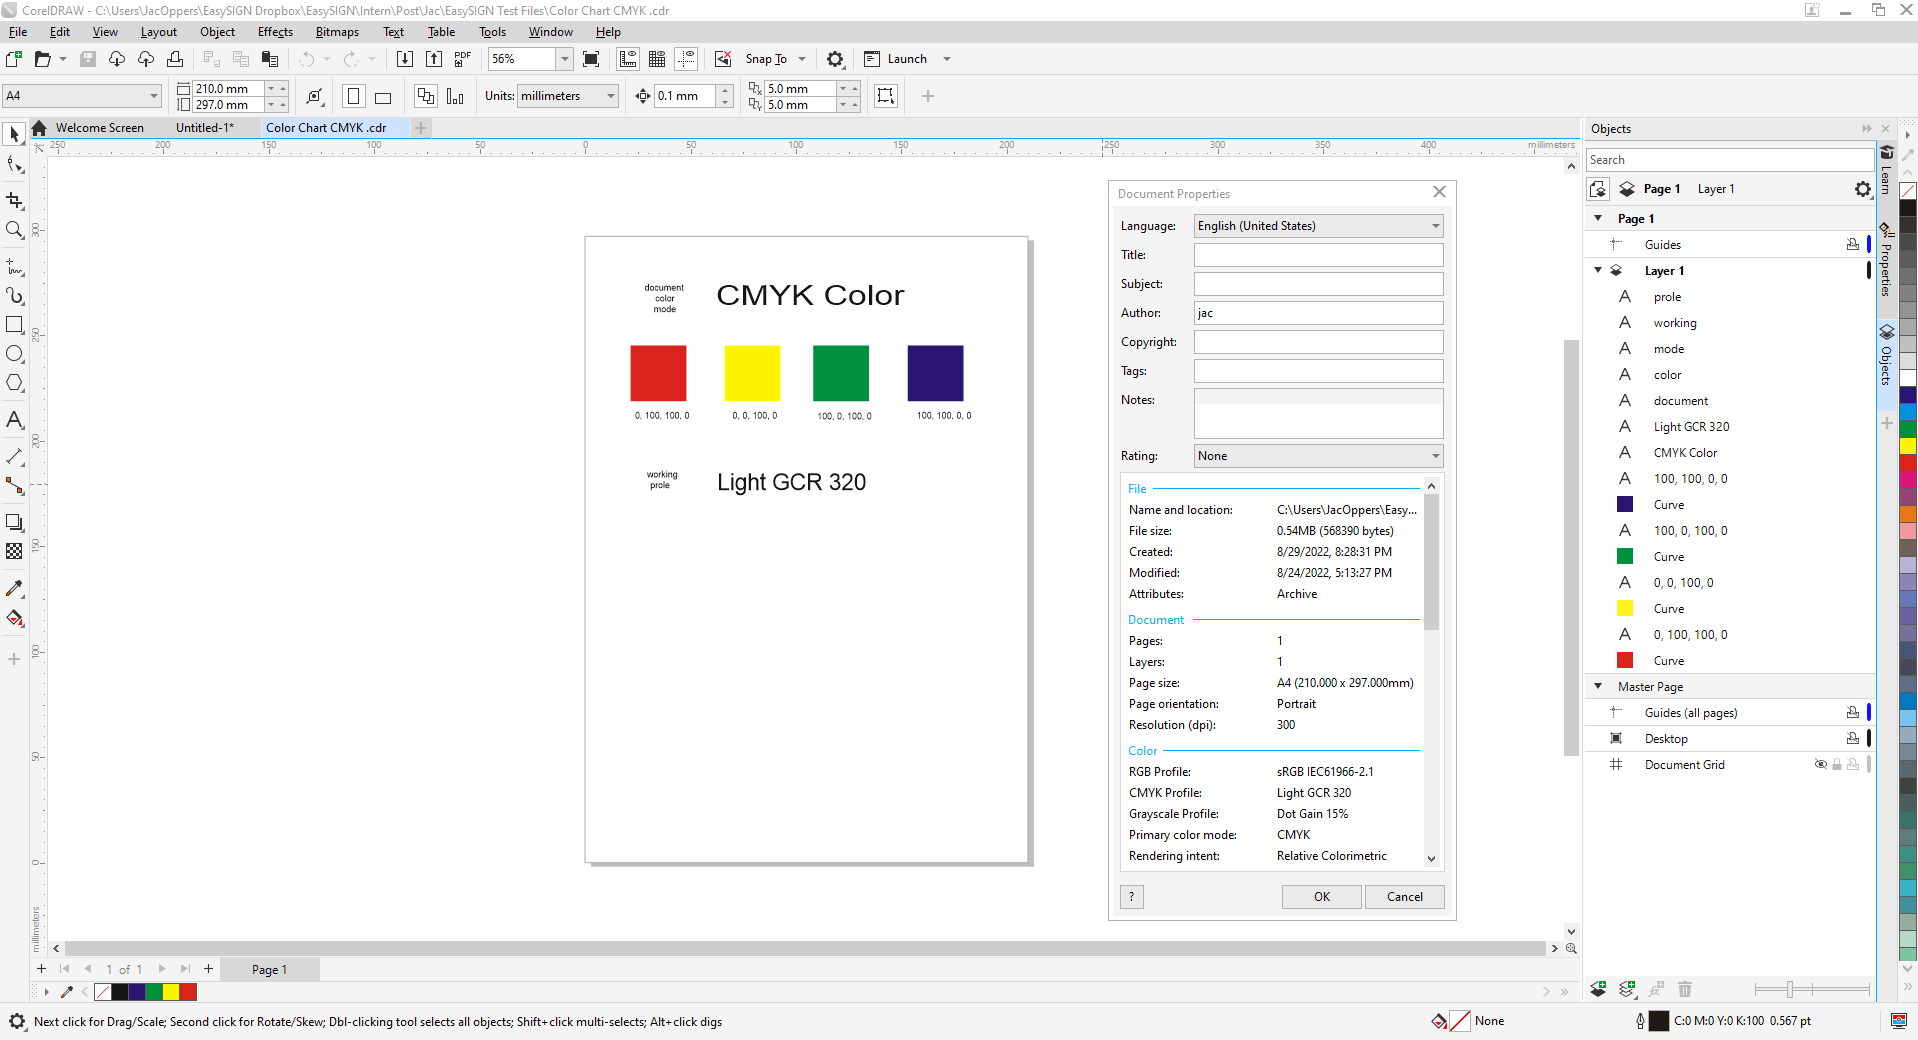
Content is transferred to EasySIGN via compatibility:
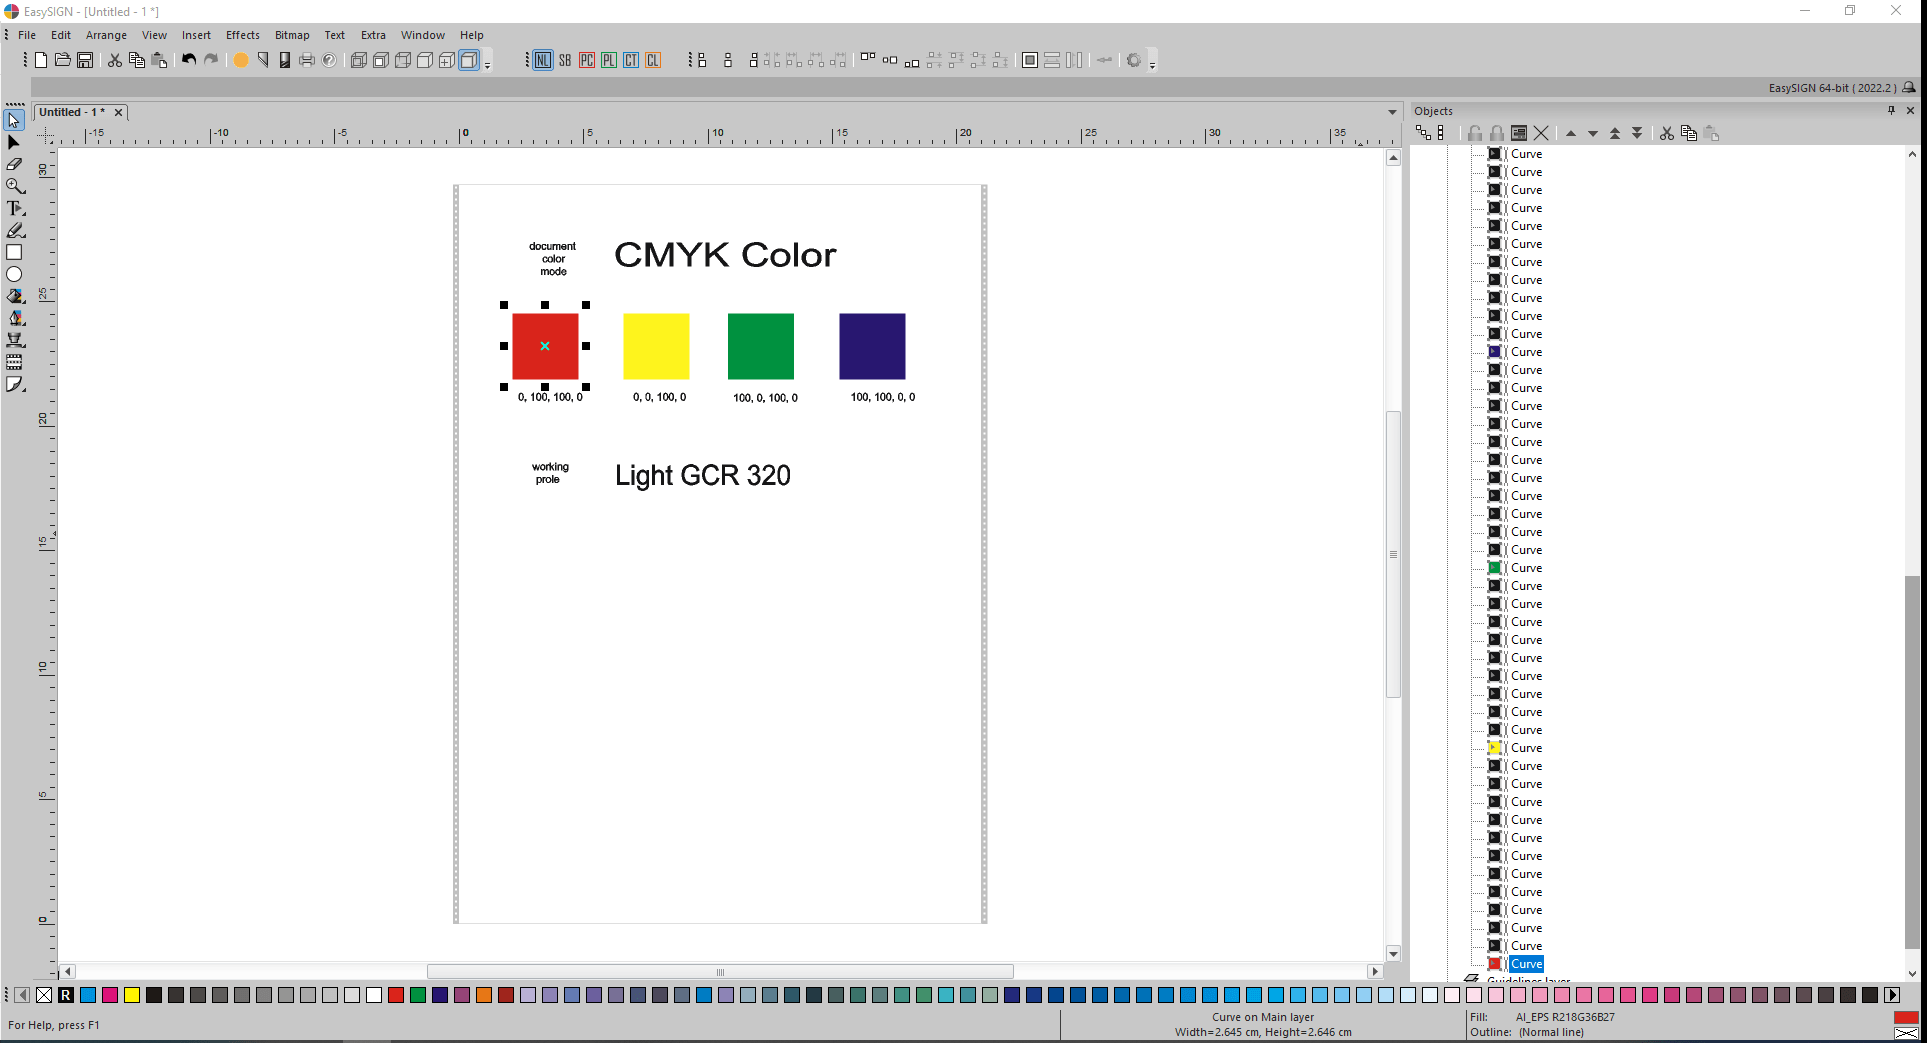
Obtained import result is not correct, thus contains minor color differences. Selected red square shows an equivalent RGB color (218,36,27) in the lower right corner instead of the original CMYK red color (0,100,100,0):
![]()
![]()
Advice of the support department of Corel is to apply the PDF-format in case of Color Management problems in CorelDRAW.
For this problem two different solutions exist in EasySIGN:
- for Starter license users, performing manually the CorelDRAW AI version 8.0 export and EasySIGN standard AI-import.
- for EasySIGN Pro users, choose compatibility exchange format PDF instead of the default AI version 8.0. This is their default EasySIGN Pro Compatibility setting:

Also here an accurate color import result after transfer via PDF exchange format of compatibility to EasySIGN:
Obtained CMYK color results are correct.
Exchange of colors between Affinity Designer and EasySIGN via copy & paste special.
First the default CMYK profile of application EasySIGN, Light GCR 320 must be placed at its proper Affinity Designer location (default Windows location for storage of color profiles):
C:\Windows\System32\spool\drivers\color\
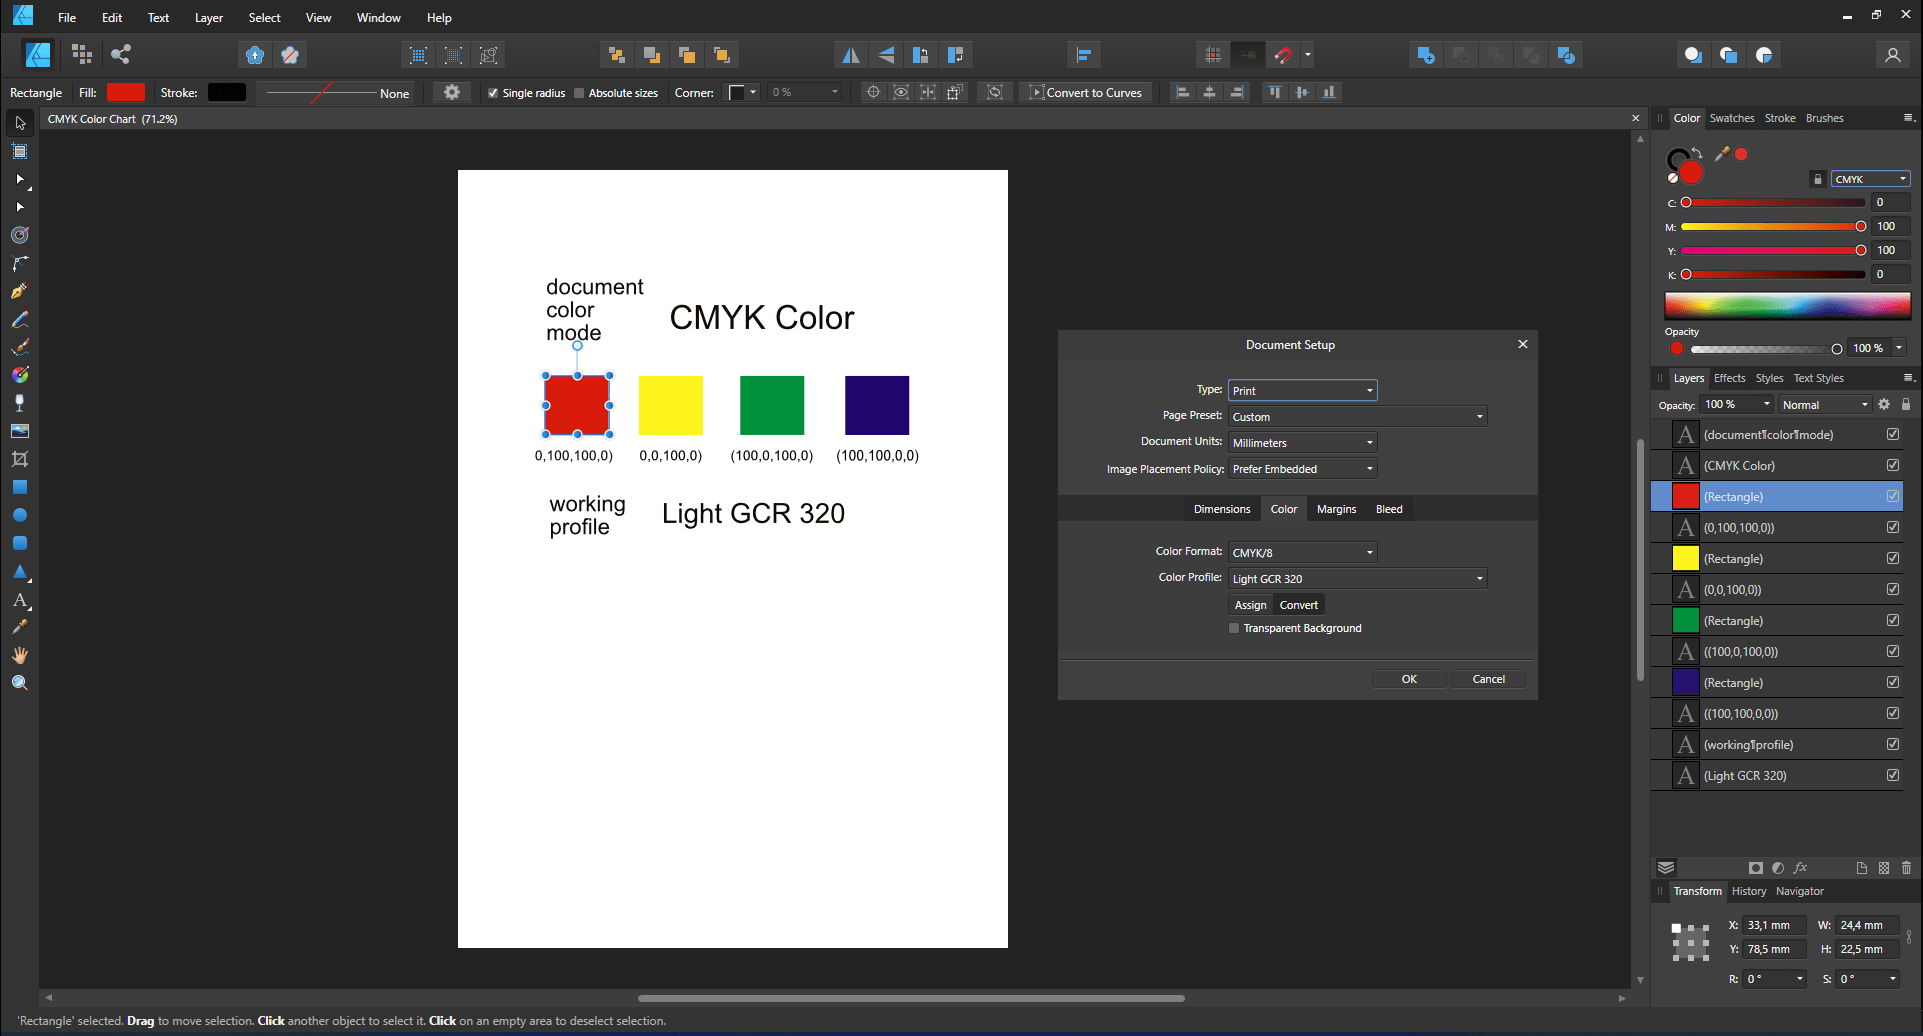
Affinity Designer advice is to create new documents with the suggested color format RGB/8 with sRGB IEc611966-2.1 color profile until output is required.
Affinity Designer and EasySIGN do share Windows clipboard content in PDF exchange format, so are able to communicate intuitively via additional copy special and paste special commands.
Following contents of the Document Setup dialog, Color Format is set to RGB/8, and Color Profile equals sRGB IEC61966-2.1:

After selection of the contents above and a copy, Affinity Designer PDF-export places PDF-content on the clipboard. Application EasySIGN retrieves this PDF-content from the clipboard via its Paste Special command:
The obtained RGB color results in EasySIGN are correct.
Following contents of the Document Setup dialog, Color Format is set to CMYK/8, and Color Profile equals Light GCR 320:
Copy (from Affinity Designer) to Paste Special (in EasySIGN):
The obtained CMYK color results in EasySIGN are correct.
PDF-export with embedded color profiles to Adobe Reader.
Following design is exported to PDF-format. This design contains 4 equal RGB bitmaps, but each assigned a different color profile. PDF-export options Embed color profiles and Open in Acrobat have both been activated in the PDF - Export settings dialog:
Obtained PDF-export result in Adobe Reader:
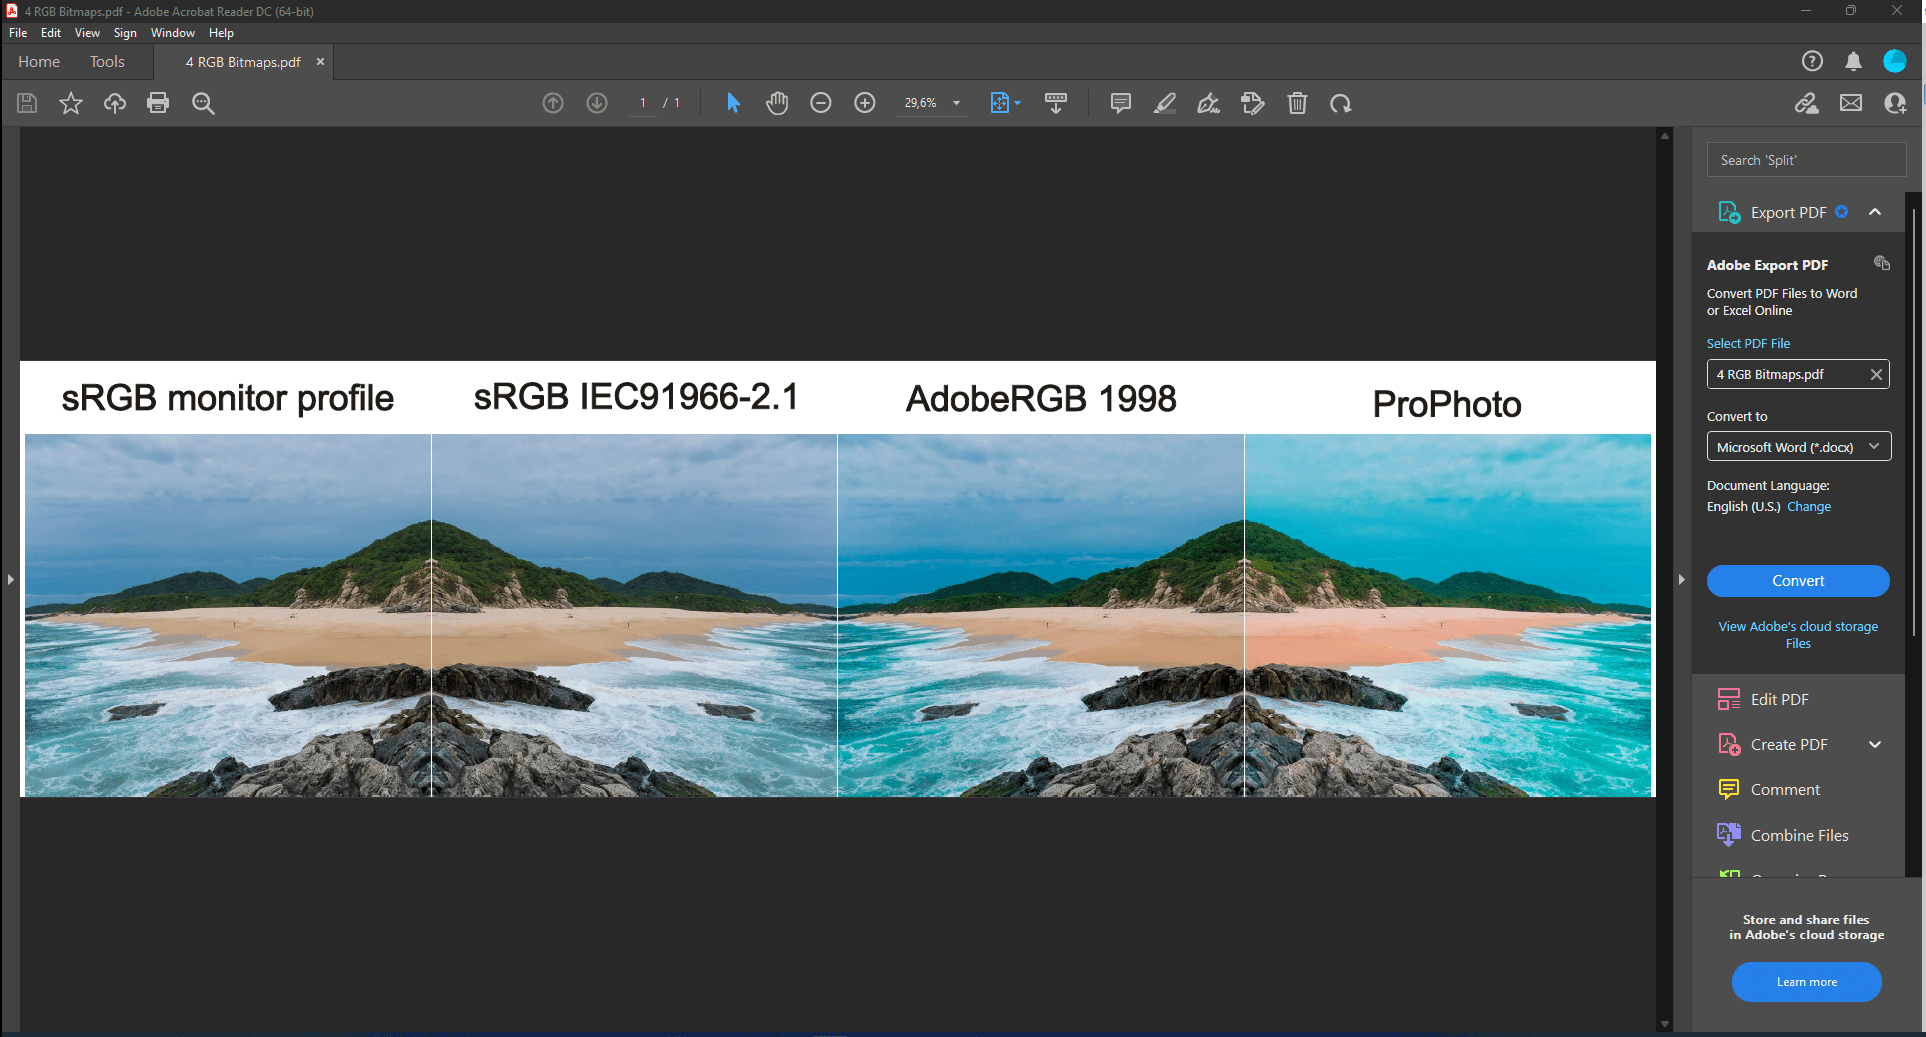
Colors of each of the 4 bitmaps are displayed correctly by Adobe Reader. Adobe Reader applies different color profiles to each of the four equal bitmaps.
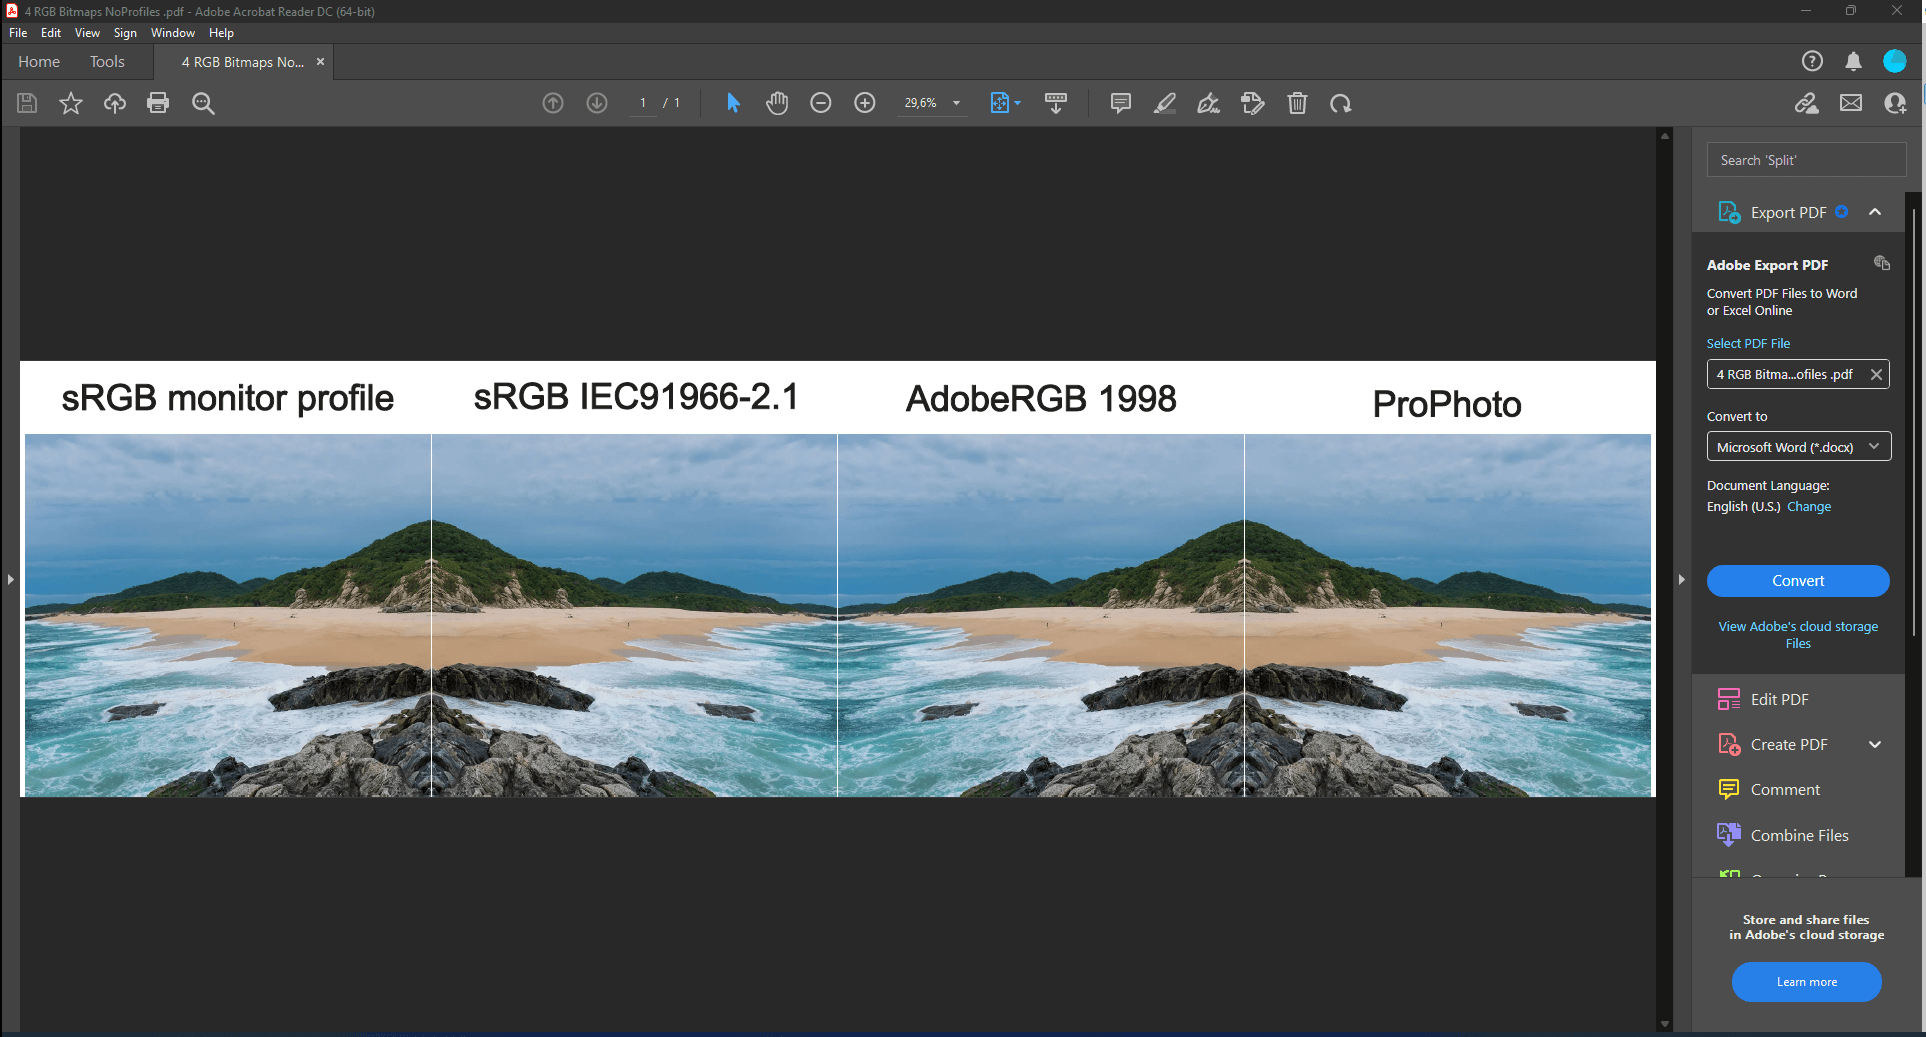
However, when PDF-export option Embed color profiles has not been activated in the PDF - Export dialog, then color proles will not be embedded into the PDF-export file. Then Adobe Reader automatically applies its own default sRGB color profile to each of the four RGB bitmaps. Consequently, the color appearances of each of these bitmaps do not differ in Adobe Reader:
When applying the AI- and EPS-export formats, then Export-option Embed color profiles is not available: during these exports make sure color profiles and color appearances between color devices do match.
Bitmap import policies – Prompt user, not color manage, document default, or embedded profile.
Most of the time the user is not aware whether an import file contains embedded color profiles for bitmaps and exactly what embedded color profile has been applied for a bitmap inside an import file. In such a case general setting Bitmap import Policy comes in handy:
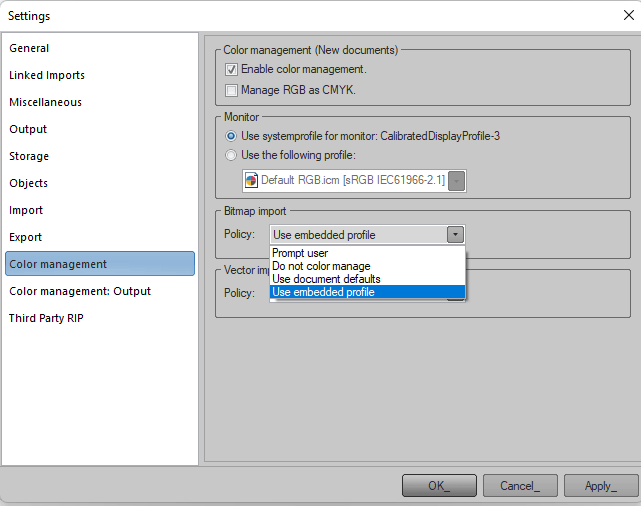
This policy determines how a color profile applies to an imported bitmap. An embedded color profile of a bitmap will always be present and manually selectable in EasySIGN. During import one of four policies will be applied:
- Prompt user: for each imported bitmap following bitmap color management policy dialog pops up:
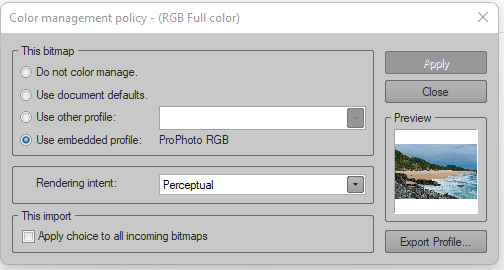
Groupbox This bitmap mentions four options. Preview window visualizes the outcome. In groupbox This import option Apply choice to all incoming bitmaps can be activated in case an import file contains many bitmaps.
- Do not color manage: bitmap will not be color managed,
- Use document defaults: document color profile will be applied to the bitmap,
- Use embedded profile: embedded profile is activated.
When option Prompt user is activated then dialog Color Management policy keeps popping up with every imported bitmap, thus also when a .jpg file is imported.
Most save option is Use embedded profile: embedded color profile present with the bitmap in the imported PDF-file is also used during the display of the PDF-file, so no differences in color appearances will occur between an actual display of the PDF-file and the obtained import result at the worksheet in EasySIGN.
As an example, the PDF-import result is shown of the previous PDF-export file containing 4 equal bitmaps, but each having assigned a different color profile. Both document color management as well as option Bitmap import Policy Use embedded profile were active:
Colors of the imported result are correct.
However, the obtained results will be very different when document color management would be switched off. Then to each bitmap option Do not color manage applies, so all four bitmaps have equal appearances, but in EasySIGN the embedded profile can still be activated manually. Option Use embedded profile mentions the profile which applies in the imported PDF-file:
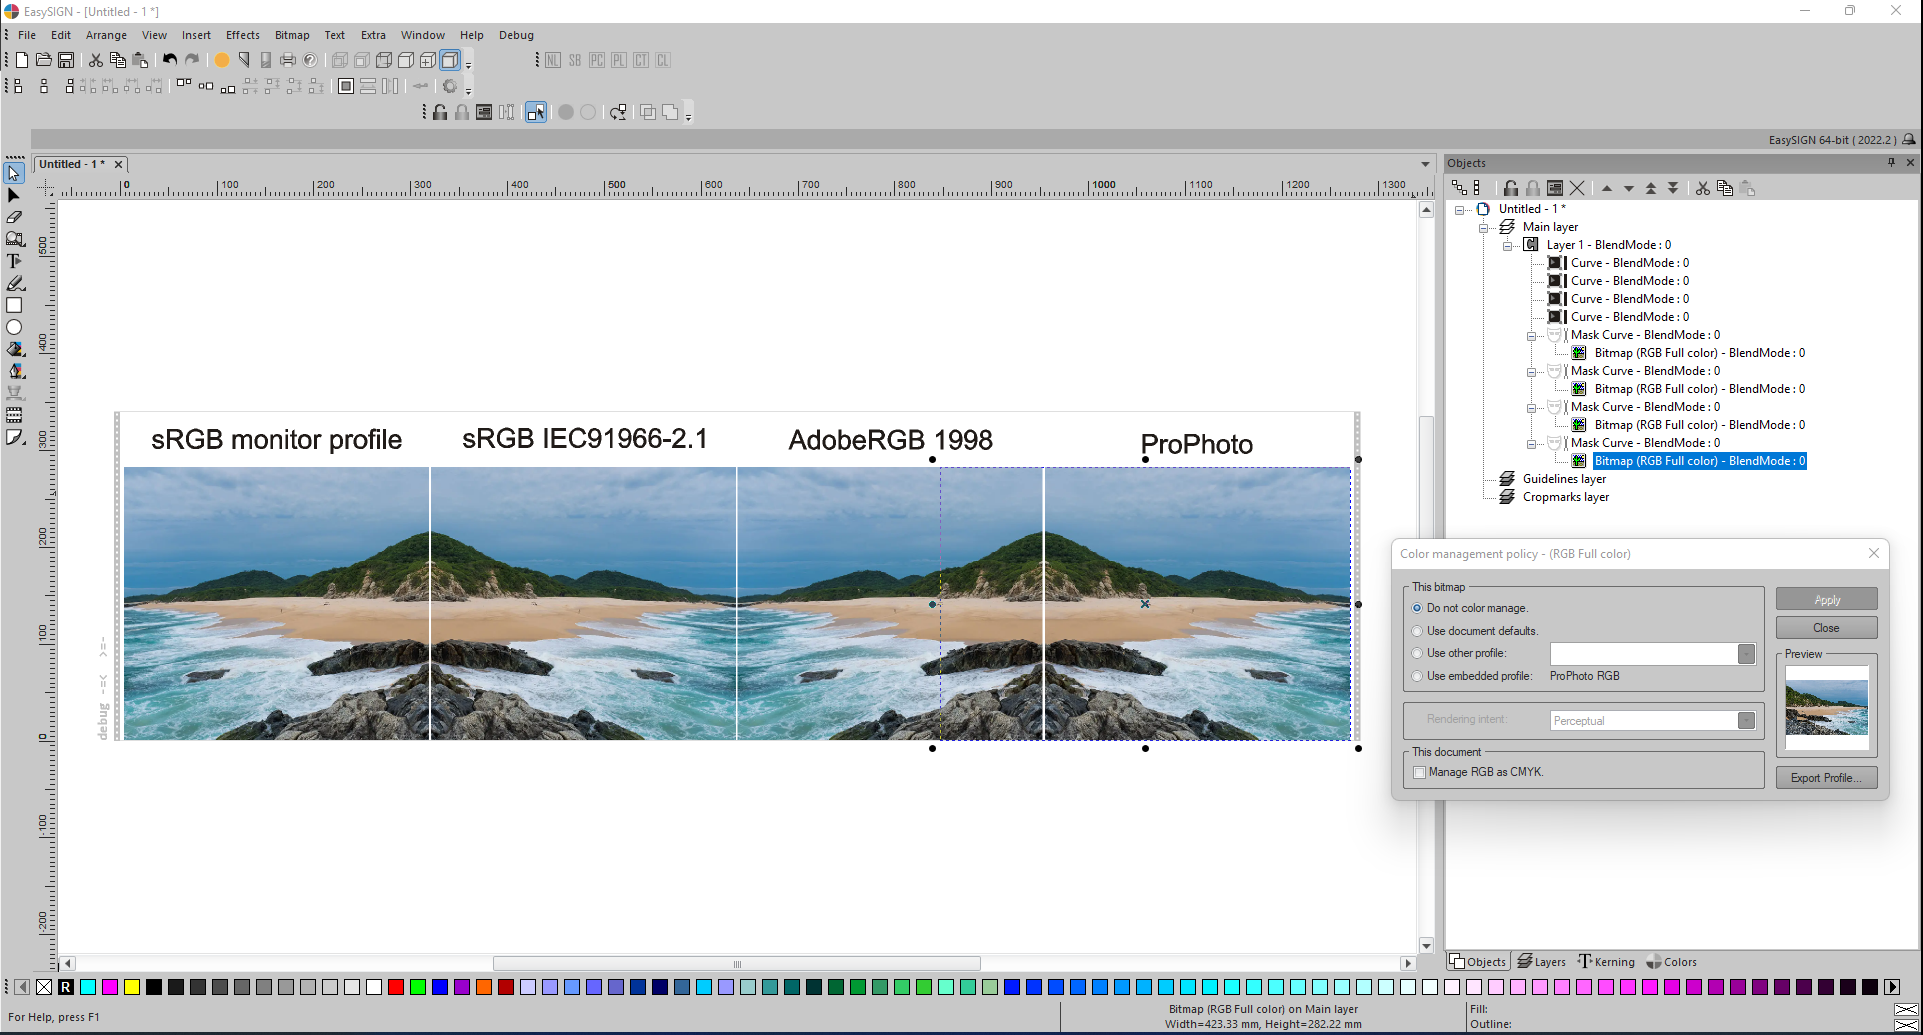
Document color management does not overrule bitmap color management. In case document color management is activated, then the embedded profiles of bitmaps will not be automatically switched on! This can be done manually, when required, for each of the bitmaps.
Vector import policies – Prompt user, Preserve color numbers or appearance.
Most of the time the user is not aware whether an import file contains embedded color profiles and exactly what embedded color profiles have been applied inside an import file. In such a case general setting Vector import Policy comes in handy. This policy determines whether or not original color values inside an import file need to be preserved during import or must be adjusted to the selected EasySIGN vector color profile to preserve color appearances. Three policies are available:
- Prompt user: prompt mentions the color profiles and user decides during import whether or not color numbers or appearances must be preserved,
- Preserve color numbers without prompting,
- Preserve color appearances without prompting.
Most save option is Preserve color numbers: never adjust color numbers during import. When imported colors appear different after import, then, afterwards, a different better fitting color profile can be selected in EasySIGN for matching the appearances of exactly the same color numbers. When option Preserve color appearances has been chosen and the color numbers do differ, then you will never ever be able to switch back to the color numbers which are present in the original import file.
You may also like
Color Management